3-Way Light Switch Only Works in Certain Positions
- Matt Cameron
- May 19
- 10 min read


If your 3-way light switch only works in certain positions, you are not alone, and the problem is more common than most homeowners realize. Three-way switches are wired differently than standard single-pole switches, and when something goes wrong inside the wiring or the switch itself, the result is a light that only responds under very specific conditions. Before you start swapping out switches or calling for help, it helps to understand exactly what is happening inside that wall. This guide walks you through the causes, the troubleshooting steps, and the repair options so you can make a smart, safe decision.
Key takeaways
Point | Details |
Position affects how circuits close | A 3-way switch routes power through traveler wires, so both switch positions must align for the circuit to complete. |
Loose wiring is the top cause | Resistance buildup from loose connections generates heat and causes intermittent switch operation. |
Label wires before disconnecting | Marking the common terminal wire prevents confusion that leads to non-functional circuits after repairs. |
Test with a multimeter | Continuity testing confirms whether the internal switch mechanism is faulty or the wiring itself is the problem. |
Know when to call a professional | Warm switch plates, crackling sounds, or unfamiliar wiring are signs to stop DIY work and get expert help. |
How three-way switches work
Most homeowners assume a light switch is simply on or off. With a 3-way switch, that assumption gets you into trouble fast. A 3-way switch setup uses three terminals: one common terminal and two traveler terminals, plus a ground. The common terminal connects either to the power source or directly to the light fixture, depending on which switch in the pair you are working with. The two traveler terminals link both switches together through a pair of wires called travelers.
Here is the key: power flows from one switch to the other through whichever traveler wire the toggle is currently connecting to. When you flip one switch, it reroutes power to the opposite traveler. The light turns on only when both switches have their toggles aligned so that the same traveler carries power from one end to the other.
This is why your switch position matters so much. When a 3-way light switch only works in certain positions, it usually means either the internal contacts are not routing correctly, or a traveler wire and the common wire are mixed up somewhere in the circuit.
Switch position | How the circuit behaves | Light status |
Both switches in matching position | Power flows through shared traveler wire | On |
One switch toggled, breaking the path | Power reroutes through open traveler | Off |
Traveler and common wires swapped | Circuit may close inconsistently | Flickering or intermittent |
Faulty switch contacts | Power routes incorrectly through toggle | Only works in one position |
Pro Tip: If your light responds to only one of the two switches, or only works when switch A is up and switch B is down, write that pattern down before you open anything. That behavior narrows down which switch or wire connection to inspect first.
Common causes of intermittent switch operation
When a 3-way light switch only works intermittently, the problem almost always falls into one of a few categories. Understanding these helps you approach troubleshooting with purpose rather than guesswork.
Loose or improperly seated wiring connections are the most frequent culprits. Wires can loosen over time from vibration, thermal expansion, or poor installation. According to resistance buildup from loose wiring, loose connections generate heat and cause flickering lights, which is a fire hazard that needs attention right away.

Crossed common and traveler wires are another common issue, especially in homes where a previous owner did DIY work without full knowledge of 3-way wiring. Faulty switch or incorrect wiring of traveler and common terminals causes the kind of position-dependent failure most homeowners describe.
Here are the warning signs you should watch for:
The light only turns on when both switches are in specific positions and nothing else works
You hear a crackling or buzzing sound when you toggle the switch
The switch plate or toggle feels warm to the touch
The light flickers before coming on fully or dims unexpectedly
The toggle feels loose or does not click firmly into position
Worn internal switch contacts are also a realistic cause, especially in older homes. A switch that has been toggled thousands of times can develop internal wear that causes partial contact failure. This is different from a wiring problem, but it produces identical symptoms. Mechanical failure inside the switch is frequently mistaken for a wiring issue, which is why testing both is worth your time.
Heat damage and corrosion are particular concerns in Gulf Coast Alabama homes near the water. Salt air and humidity accelerate corrosion on switch terminals, which increases resistance and causes exactly the kind of erratic behavior you may be experiencing.
Pro Tip: A warm switch plate is never normal. If you touch your switch cover and it feels noticeably warm, turn off the breaker for that circuit immediately and do not use that switch until you have had the wiring inspected.
Step-by-step troubleshooting for homeowners
Safe 3-way switch troubleshooting follows a clear sequence. Skipping steps, especially the first one, creates real risk.
Turn off the circuit breaker for the switch you plan to inspect. Do not rely on the switch itself to cut power. Go to your breaker panel and flip the correct breaker to off.
Verify power is off using a non-contact voltage tester before you touch a single wire. Hold the tester near the switch terminals after removing the cover plate. If it beeps or lights up, power is still present. Always verify power is off at the breaker and confirm with a tester before proceeding.
Remove the switch cover plate with a flathead screwdriver and gently pull the switch body out from the wall box. You do not need to disconnect anything yet. Just look.
Inspect the wiring terminals. Look closely at the screws on the common terminal (usually black or marked “COM”) and both traveler terminals. Check for wires that appear burned, discolored, frayed, or only partially seated under the screw head.
Check for loose screws and wire nuts. Tighten any screws that have any give. If you see wire nuts in the back of the box, gently tug each wire to confirm it is not pulling free. Tightening wire nuts and terminal screws prevents the intermittent faults that cause position-dependent failures.
Confirm correct wiring order. The common terminal should carry the wire going to your power source or your light fixture. The two traveler terminals carry the wires connecting both switches. If you see two identical wires on the common terminal, the wiring is wrong.
Test the switch with a multimeter set to continuity mode. With the switch disconnected and power off, touch your probes to the common terminal and one traveler terminal. Toggle the switch. Continuity should transfer from one traveler to the other with each toggle. Continuity testing in this manner confirms whether the internal mechanism is working correctly or the switch itself has failed.
Stop and call a licensed electrician if you find burned wires, wiring that does not match any standard 3-way diagram, or if the box shows signs of heat damage. Those are not DIY repair situations.
Pro Tip: Take a photo of the wiring before you disconnect anything. Most smartphones capture enough detail to show you which wire sits on which terminal, and that photo becomes your reference when reconnecting.
Repair options for a faulty 3-way switch
Once you have identified the source of your problem, you have a few clear paths forward.
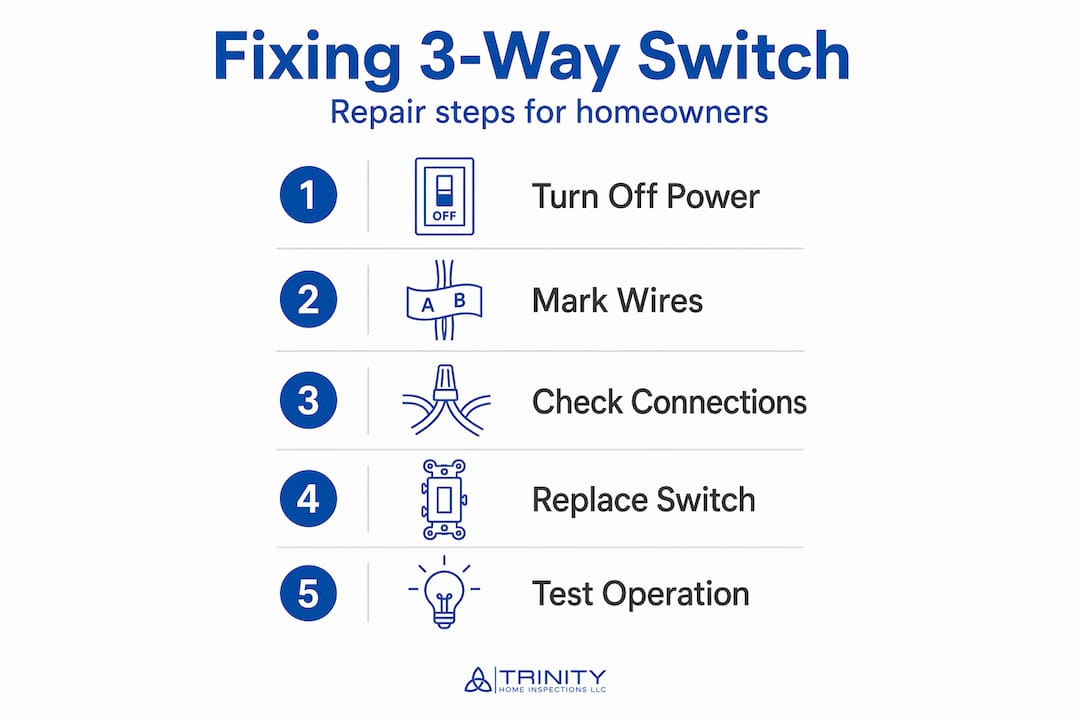
Correcting swapped common and traveler wires is the most common fix after improper prior installation. If your traveler wire ended up on the common terminal, the circuit behaves inconsistently. To avoid recreating this problem during repair, wrap the common terminal wire with a small piece of electrical tape before disconnecting it. That marking tells you exactly where it goes back.
Replacing a worn or faulty switch is straightforward when you confirm through continuity testing that the internal contacts are the problem. Standard 3-way switches are inexpensive and available at any hardware store. Match the brand if possible and confirm the replacement is rated for 3-way use. A single-pole switch looks almost identical but will not work in this circuit.
Smart switch compatibility deserves a separate mention because many homeowners try to upgrade one switch in a 3-way pair and end up with new problems. Smart switches require a neutral wire and constant power, and mixing a smart switch with a traditional 3-way switch in the same circuit creates compatibility issues that are difficult to diagnose. If you want smart switches, replace both switches in the pair with a compatible smart 3-way system designed to work together.
Here is a quick comparison to help you decide which repair path fits your situation:
Problem identified | Recommended repair | DIY or professional |
Loose terminal screws only | Tighten screws and reconnect wires | DIY with care |
Swapped common and traveler wires | Correct wiring order using photo or diagram | DIY if confident |
Failed internal switch contacts | Replace the 3-way switch | DIY with correct replacement |
Burned wires or heat damage | Full wiring inspection and repair | Licensed electrician |
Smart switch compatibility failure | Replace both switches with matched smart system | Professional recommended |
Signs you should not ignore include a warm switch plate, a burning smell near the switch, or visible scorch marks inside the box. These are not minor inconveniences. Increased electrical resistance from these conditions can lead to overheating and fire hazards, which means the right call is to stop, leave the breaker off, and get a professional on the phone.
Keeping your three-way switches reliable long-term
Preventing future failures takes less effort than fixing them after the fact. A few consistent habits go a long way.
Schedule a professional electrical inspection every few years, especially in older homes or properties that have had multiple owners with unknown DIY history
Tighten terminal screws during any switch replacement or inspection, even if they seem fine, because vibration gradually loosens them over time
Avoid mixing smart switches and traditional switches in the same 3-way circuit without confirming full compatibility from the manufacturer
Listen for crackling or buzzing sounds when you toggle switches, because those sounds indicate arcing, which is an immediate safety concern
Watch for signs of corrosion on switch terminals if you live near the Gulf Coast, as salt air accelerates electrical degradation faster than most homeowners expect
Label wires clearly any time you open a switch box, even if you are only making a minor adjustment, so future repairs start with accurate information rather than guesswork
If you are buying a home in Baldwin County, Mobile, or surrounding Gulf Coast areas, a thorough electrical inspection guide can help you understand what to look for before problems like these become your responsibility to fix.
My take on 3-way switch problems and what homeowners miss
I have walked through a lot of homes in this region, and 3-way switch issues come up more often than people expect. What I consistently see is that homeowners assume the switch itself is bad and replace it without ever checking the wiring. They put a brand new switch in, the light still only works in one position, and now they are convinced something mysterious is going on. In most of those cases, the original switch was fine. The wires were simply landed on the wrong terminals.
The other thing I see regularly is what happens after someone upgrades a switch themselves without marking their wires. They disconnect everything, lose track of which wire was the common, and reconnect based on color alone. Here in Alabama, wire colors in older homes do not always follow modern conventions. What looks like a traveler wire can actually be the common depending on how the original electrician ran the circuit. That is a recipe for exactly the kind of intermittent, position-dependent problem you are dealing with.
My honest advice: if you feel comfortable working safely with the power off and you have a clear wiring reference, fixing a 3-way switch is a reasonable DIY project. But if there is any heat damage, any burned smell, or any wiring that you genuinely cannot identify, please stop there. Electrical fires do not give you a lot of warning. The cost of a professional inspection is far lower than the cost of what happens when something goes wrong.
Thermal imaging can also reveal what your eyes cannot. At Trinity Home Inspections, we use thermal cameras to spot overheating inside walls and electrical components that look completely normal on the surface. That is the kind of detail that protects you long before a problem becomes serious.
— Matt
Get expert electrical insight from Trinity Home Inspections
Dealing with a 3-way switch that only works in certain positions is frustrating, but it is also a signal worth taking seriously. Electrical issues that go unaddressed have a way of getting worse over time, not better. If your troubleshooting reveals anything beyond a simple loose screw, or if you simply want a professional set of eyes on your home’s electrical system, Trinity Home Inspections is here to help.
[

We serve homeowners across Mobile, Baldwin, Escambia, and surrounding Gulf Coast Alabama counties. Every inspection includes free thermal imaging to help detect overheated components and wiring issues that are not visible to the naked eye. We also offer permit and deed searches to help you understand the electrical history of any home you are buying or already own. Our same-day reports are clear, color-coded, and written in plain English so you know exactly what to do next.
Call us at 251-210-7376 or visit TrinityInspectionsLLC.com to schedule your inspection today.
FAQ
Why does my 3-way switch only work in one position?
When a 3-way light switch only works in certain positions, it usually means a traveler wire and the common wire are connected to the wrong terminals, or the switch’s internal contacts have worn out. Testing with a multimeter in continuity mode helps pinpoint which problem you have.
How do I test a 3-way switch to see if it is bad?
With the power off and the switch disconnected, set a multimeter to continuity mode and touch the probes to the common terminal and each traveler terminal while toggling the switch. A good switch transfers continuity cleanly from one traveler to the other with each toggle.
Is a warm 3-way switch plate a safety concern?
Yes. A warm switch plate indicates resistance buildup from a loose connection or failing contacts, both of which can generate heat and become a fire hazard. Turn off the breaker for that circuit and do not use the switch until it has been inspected.
Can I replace only one switch in a 3-way pair with a smart switch?
Generally no. Smart switches require a neutral wire and constant power, and mixing one smart switch with one traditional 3-way switch causes compatibility issues. Replace both switches with a matched smart 3-way system designed to work together.
When should I stop DIY troubleshooting and call an electrician?
Stop and call a licensed electrician if you find burned wires, scorch marks, a burning smell, wiring that does not match any standard 3-way diagram, or any sign of heat damage inside the switch box. These conditions go beyond standard DIY repair territory.
Recommended