
Should Mesh Covers Be Removed from Laundry Vents?
- Matt Cameron
- May 20
- 10 min read
Most homeowners who install mesh covers on laundry vents are trying to solve a real problem: keeping bugs and small critters out. The intention is good. The result, though, can be dangerous. Should mesh covers be removed from laundry vents? The short answer is yes, and building codes actually require it. Mesh screens trap lint rapidly, choke airflow, and turn your dryer vent into a fire risk that grows with every load of laundry. This guide breaks down exactly why mesh covers create problems, what the current building code says, and what you should use instead.
Key takeaways
Point | Details |
Mesh covers must come off | Mesh screens at dryer vent terminations are prohibited by the 2024 IRC and create serious fire hazards. |
Lint buildup happens fast | Airflow can drop by up to 50% after just a few loads when mesh is present at the vent opening. |
Backdraft damper caps are the solution | Listed vent caps with floating backdraft dampers block pests effectively without trapping lint. |
Regular inspection is non-negotiable | Exterior vent caps should be checked every three to six months for proper damper function and lint buildup. |
Professional inspections catch what you miss | Home inspectors routinely flag mesh screens and hidden lint buildup that homeowners overlook entirely. |
How dryer vents work and why airflow matters
Your dryer does one primary job: remove moisture and heat from wet clothes. It accomplishes that by pushing hot, humid, lint-laden air through a duct to the outside of your home. The path that air travels matters just as much as the dryer itself. A clear, unobstructed duct means shorter drying times, lower energy bills, and a much safer laundry room.
The exterior vent cap is the final piece of that system. It sits on your home’s outside wall or roof and serves two functions. First, it allows exhaust air to exit freely when the dryer runs. Second, it seals the opening when the dryer is off, which prevents cold drafts, humidity, and pests from entering your ductwork. The mechanism that handles that second function is called a backdraft damper, a small flap that opens under airflow pressure and closes when the dryer stops.
Here is what a properly functioning dryer vent system looks like from start to finish:
Lint trap: Catches the majority of lint inside the dryer cabinet before air enters the duct.
Rigid or semi-rigid duct: Carries exhaust from the dryer to the exterior, ideally using smooth-walled aluminum or steel.
Exterior vent cap with backdraft damper: Terminates the duct outside, allows exhaust to exit, and seals when the dryer is idle.
The problem is that lint captures only 75 to 80% of particulate inside the dryer. That remaining 20 to 25% travels into your ductwork with every cycle. Over time, it coats the inside of the duct and collects around the vent termination. A properly designed cap with a backdraft damper handles this gracefully because it has no fine mesh to catch lint. Air and lint exit freely, the damper closes, and the cycle repeats without blockage.
Pro Tip: When inspecting your vent cap, push the damper flap open with your finger from outside. It should move freely and spring back to close on its own. A stiff or stuck damper is a maintenance issue worth addressing before your next laundry day.
For a deeper look at maintaining your home’s ventilation systems yourself, the HVAC maintenance guide from Trinity Home Inspections walks through several key systems in plain language.
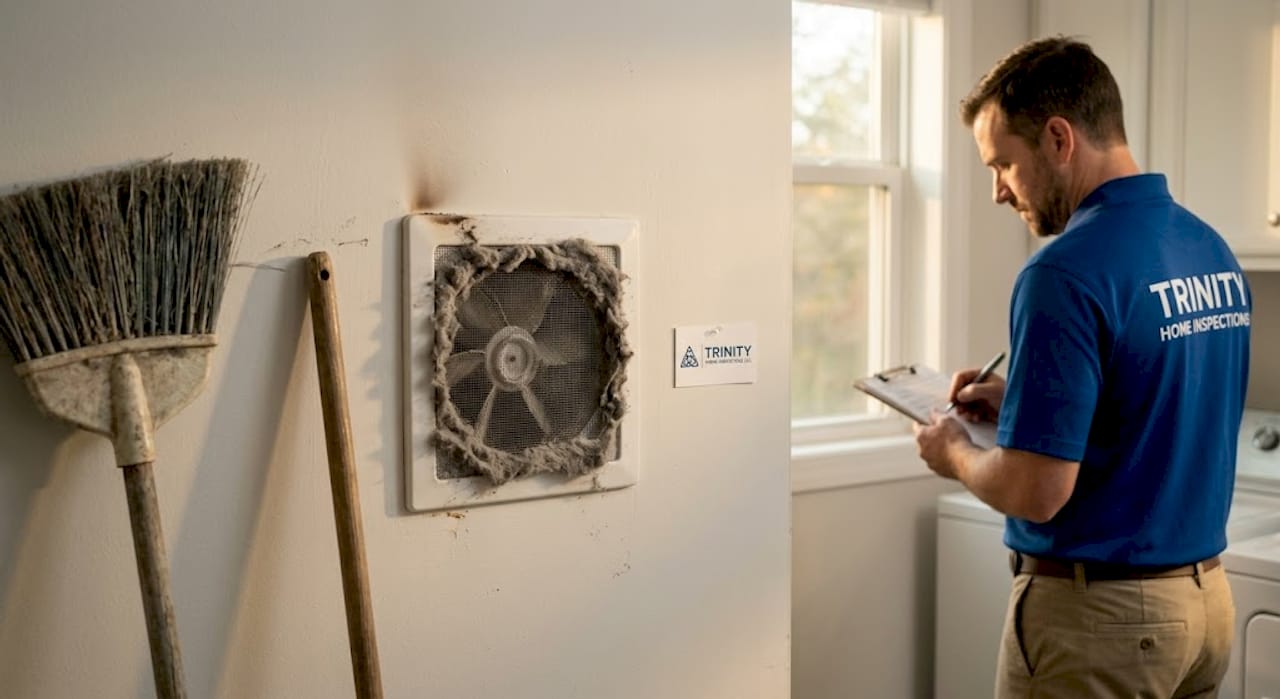
The real risks of mesh covers on dryer vents
This is where the conversation gets serious. Mesh screens feel like a logical solution when you spot a gap at your vent opening. In practice, they work against the basic physics of how a dryer functions.
Mesh screens at vent terminations cause lint to accumulate at the vent opening, reducing airflow by up to 50% within just a few laundry loads. That is not a slow, gradual problem. You can go from a clear vent to a significantly blocked one faster than most people realize.
What the numbers say: Clothes dryers cause approximately 15,000 residential fires annually in North America, with lint buildup identified as the leading cause. A clogged vent covered in accumulated lint is not a minor inconvenience. It is a combustion risk sitting in the wall of your home.
Here is a breakdown of how the risks compound when mesh covers are left in place:
Risk Factor | Without Mesh Cover | With Mesh Cover |
Airflow restriction | Minimal if duct is clean | Up to 50% reduction within a few cycles |
Lint accumulation at termination | Low | High and rapid |
Dryer operating temperature | Normal range | Elevated due to restricted exhaust |
Pest entry prevention | Handled by backdraft damper | Covered but at severe cost to safety |
Code compliance (2024 IRC) | Compliant with proper cap | Non-compliant, flagged by inspectors |
The thermal consequence of restricted airflow is worth understanding. When hot exhaust cannot exit the duct efficiently, heat backs up inside the dryer drum and ductwork. The dryer’s thermal limiter may trip repeatedly, shortening appliance life. Worse, the overheating caused by mesh-covered vents forces longer drying cycles, which means more heat, more time, and a greater chance that accumulated lint reaches its ignition point.
Lint is highly combustible. It is light, dry, and made of the same cellulose and synthetic fibers that catch fire easily. Lint that bypasses the lint trap collects in ductwork and around vent terminations. When a mesh cover concentrates that lint at the exit point, it creates a dense, flammable mass right where exhaust heat is highest. That combination is exactly why mesh covers have been written out of the building code.
Safer alternatives to mesh covers
The good news is that you do not have to choose between pest prevention and fire safety. The right vent cap gives you both, without the risk.
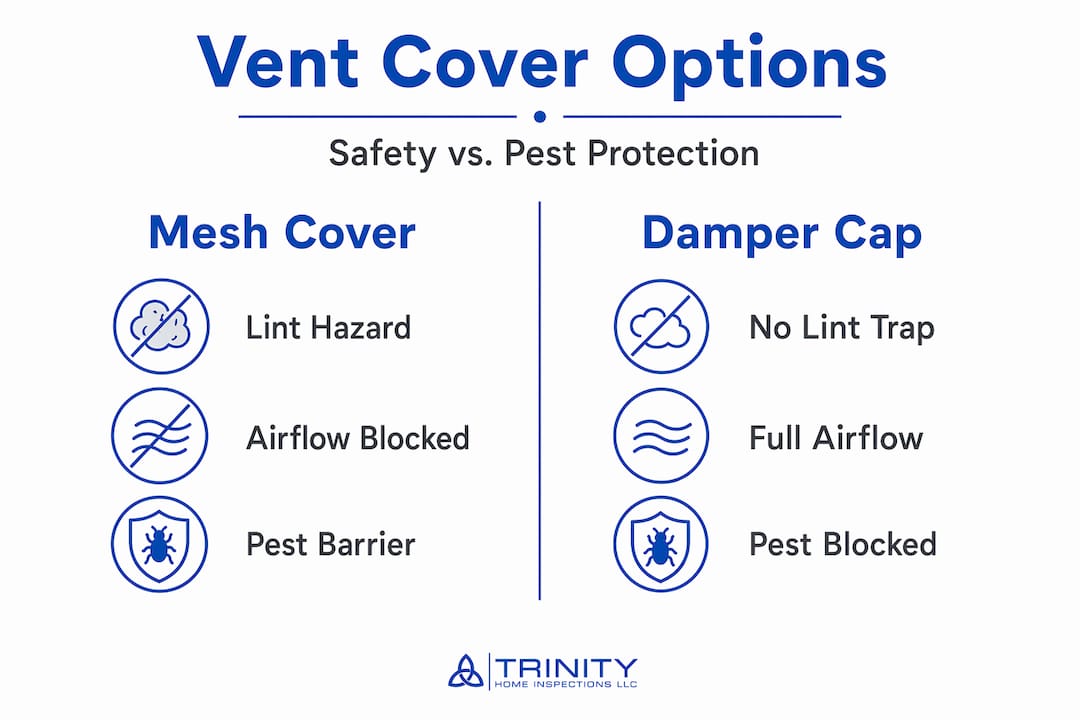
A listed dryer vent cap with a floating backdraft damper is the code-approved solution. The damper is a hinged or floating flap that sits flush against the vent opening when the dryer is off. Air pressure from the running dryer pushes it open, exhaust exits, and it closes again when the cycle ends. Pests cannot enter through a closed damper, and there is no mesh to trap lint.
Here is how the two approaches compare directly:
Feature | Mesh Cover | Backdraft Damper Cap |
Pest prevention | Yes, but problematic | Yes, without side effects |
Lint accumulation | Rapid and severe | Minimal to none |
Airflow impact | Significantly restricted | Unrestricted when dryer runs |
Code compliance | Prohibited by 2024 IRC | Required by 2024 IRC |
Cleaning frequency required | Every few weeks at minimum | Every three to six months |
Approximate cost | Low | Low to moderate |
Experts advise that if someone has already installed mesh screens and refuses to remove them, cleaning them every few weeks is the minimum necessary to reduce risk. But that is a distant second to simply replacing them with a proper dampered cap. The preferred solution is always a listed cap with a functional backdraft damper.
Louvered vent covers are another option you will see in hardware stores. These use a set of angled slats that open when air flows and close under their own weight when the dryer stops. They are code-compliant as long as they carry a listing for dryer exhaust use and do not incorporate mesh screening. Always check the product label before purchasing.
Here are the key qualities to look for when choosing a replacement vent cap:
Listed specifically for dryer exhaust use
Features a functional backdraft damper or weighted louvers
No mesh screen of any kind at the termination point
Made from durable aluminum or galvanized steel
Sized to match your duct diameter, typically four inches for residential dryers
Pro Tip: Take a photo of your current vent cap before heading to the hardware store. Knowing the duct diameter, the mounting style, and the wall thickness saves you a second trip and makes matching the replacement much easier.
For more guidance on selecting the right vent covers for Gulf Coast humidity and conditions, the article on exhaust vent covers for humid climates from Trinity Home Inspections offers practical local advice.
DIY steps for inspecting and replacing dryer vent covers
Removing a mesh cover and replacing it with a proper cap is a manageable weekend project for most homeowners. Here is how to do it safely and correctly.
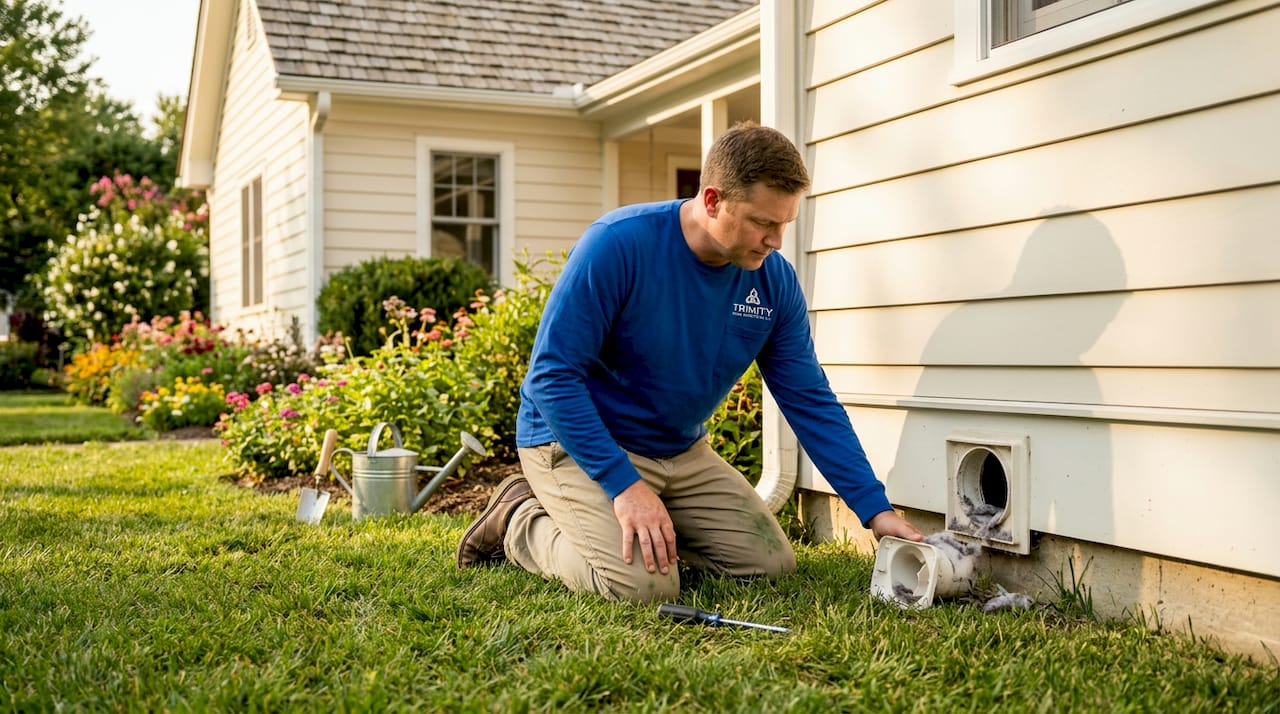
Step 1: Locate and access the exterior vent termination. Walk around the outside of your home and find where your dryer vent exits. It is usually on an exterior wall, low on the house, within a few feet of where your dryer sits inside. On some older homes it may terminate through the soffit or roof, though wall terminations are strongly preferred.
Step 2: Remove the existing mesh cover. Most vent covers attach with two to four screws through a flange into the exterior wall. Remove the screws, pull the cover away from the wall, and detach it from the duct. If it has been painted over or caulked, use a utility knife to score around the flange before pulling.
Step 3: Inspect the duct at the termination. Before installing a new cap, shine a flashlight into the duct opening. Look for lint buildup along the duct walls, any obstructions, and signs of damage such as gaps, holes, or disconnected sections. If you see significant lint accumulation, this is the time to clean your dryer vent before sealing it up again.
Step 4: Check how the duct is connected. This is where a common DIY mistake shows up. Screws inside dryer ducts create snag points that trap lint and accelerate buildup. If the duct sections are joined with exposed screw tips on the interior surface, replace those connections with foil tape or clamps instead. Smooth interior surfaces keep lint moving freely toward the exit.
Step 5: Install the new listed vent cap. Slide the new cap’s collar into the duct, press the flange flush against the exterior wall, and secure it with the provided screws. Seal the gap between the flange and the wall with exterior-grade caulk. This prevents water intrusion in addition to drafts.
Step 6: Test the damper and airflow. Run your dryer on a timed cycle and go outside to verify that the damper opens fully and that you can feel warm air exiting. After the dryer stops, check that the damper closes completely on its own.
Beyond this initial replacement, stay on a regular maintenance schedule:
Clean the interior lint trap after every single load.
Vacuum the lint trap housing monthly to clear buildup behind the screen.
Inspect the exterior vent cap every three to six months for proper damper function, lint accumulation, and pest nesting.
Schedule a full duct cleaning once per year if you do multiple loads per week, or every two years for lighter use.
Building codes and what inspectors look for
The 2024 International Residential Code is explicit on this topic. IRC Section M1502.3 governs dryer vent termination and sets clear requirements that directly address the mesh cover question.
Here is what the code requires for dryer vent terminations:
The exterior cap must be listed specifically for use with dryer exhaust systems.
The cap must include a backdraft damper.
No mesh screens of any kind are permitted at the vent termination.
The termination point must be at least 12 inches above finished grade.
The vent must terminate at least three feet from any window, door, or opening into the building.
The cap must direct exhaust away from adjacent surfaces to prevent moisture and lint damage.
Home inspection reports routinely flag mesh screens at dryer vent terminations as code violations and fire hazards. When a certified inspector checks your dryer vent, they are looking at the same list: no screen at the termination, a functional damper, proper clearance from openings, and overall duct condition.
For homeowners in Alabama, staying current with Alabama residential HVAC codes is worth the time, especially if your home was built or had laundry room modifications done before recent code updates were adopted. Many older installations still have mesh covers in place simply because they were never updated after the rules changed. That is not a sign of negligence. It is just a maintenance gap waiting to be closed.
If you are buying or selling a home, this is exactly the type of detail a pre-listing inspection is designed to catch before it becomes a negotiation problem or, worse, a safety incident.
My take on mesh covers after years of inspections
I want to be straightforward with you here. In my experience inspecting homes across the Gulf Coast, the mesh cover issue comes up regularly, and every time it does, I understand why the homeowner put it there. Nobody installs a mesh screen because they want to cause problems. They install it because they found a bug or a bird feather near their dryer vent, and a screen at the hardware store looked like a common-sense fix.
What surprises most people is how fast lint builds up on that screen. I have seen vents so packed with lint that you could not see through the mesh at all, and the homeowner had no idea because the dryer still seemed to be working. It was working, but much harder than it should have been, and the fire risk had been quietly growing for months.
The most practical thing I can tell you is this: the pest prevention problem has a real solution that does not create a bigger problem. A proper backdraft damper cap handles both jobs. It costs a few dollars more than a mesh screen, takes the same amount of time to install, and never requires the constant cleaning that mesh demands. Once it is in, you check it twice a year and move on.
What I have also learned is that dryer vent cleaning is one of the most underrated home maintenance tasks there is. People think about gutters, filters, and water heaters. The dryer vent gets forgotten until there is a problem. Do not wait for the problem.
— Matt
Get a professional eye on your dryer vent
[

If you are not sure what is covering your dryer vent, or when it was last inspected, that is worth fixing before the next laundry cycle. At Trinity Home Inspections, we check dryer vent terminations as part of every home inspection. We look for mesh screens, stuck dampers, improper duct materials, lint accumulation, and code compliance issues, all captured in your same-day report with photos and clear priority ratings.
Whether you are buying, selling, or just want peace of mind about your current home, our pre-listing inspection service is a practical starting point. You can also use our permit and property search tool to verify what work has been permitted on your home. Call us at 251-210-7376 or visit TrinityInspectionsLLC.com to schedule. We serve Mobile, Baldwin, Escambia, and surrounding Gulf Coast Alabama communities.
FAQ
Should mesh covers be removed from laundry vents?
Yes. Mesh covers at dryer vent terminations are prohibited by the 2024 IRC and should be removed and replaced with a listed vent cap that includes a backdraft damper.
Are mesh covers necessary to keep pests out of dryer vents?
No. A properly installed backdraft damper cap blocks pests without trapping lint, making mesh covers both unnecessary and counterproductive for dryer vents.
How quickly do mesh covers become a fire hazard?
Mesh screens can reduce airflow by up to 50% within just a few laundry loads, creating a lint blockage that raises dryer operating temperatures and fire risk rapidly.
When should I replace my dryer vent cover?
Replace your vent cover immediately if it has mesh screening, if the backdraft damper is stuck open or closed, or if you notice longer drying times and excess heat around the dryer.
How often should exterior dryer vent caps be inspected?
Exterior vent caps should be inspected every three to six months to confirm the damper opens and closes freely and that no lint or debris has accumulated at the termination point.
Recommended