Home Inspection for Sellers Guide: Prepare and Profit
- Matt Cameron
- 1 hour ago
- 10 min read

A home inspection for sellers is a proactive, professional evaluation of your property’s condition conducted before you list it on the market. Known formally as a pre-listing inspection, this process gives you the seller’s perspective on what a buyer’s inspector will find, so you control the narrative instead of reacting to it. Inspection issues drive 15% of contract cancellations, making preparation the single most effective step you can take to protect your sale. This home inspection for sellers guide walks you through every stage: what to prepare, what inspectors examine, how to prioritize repairs, and how to use your report as a negotiation tool.
What does a home inspection for sellers actually involve?
A pre-listing home inspection follows the same process as a buyer’s inspection, covering the structure, major systems, and safety features of your home. The key difference is timing and purpose. When you order it before listing, you get the findings first, giving you weeks or months to address problems on your own terms rather than under contract pressure.
Sellers who schedule early give themselves enough runway to complete repairs, gather documentation, and adjust their asking price based on accurate condition data. A rushed fix made during a five-day inspection contingency window rarely looks as credible to a buyer as a documented repair completed before the home ever hit the market. The psychological difference is significant.
Pre-listing inspections typically cost between $300 and $500. That investment pays off: 65% of sellers who address pre-listing issues avoid buyer concession requests entirely. Avoiding even one round of repair negotiations can save you thousands and weeks of closing delays.
The inspector conducts a non-invasive visual assessment of accessible areas. They do not open walls or perform destructive testing. What they do examine is thorough: roof, foundation, electrical panels, HVAC systems, plumbing, attic, crawl space, and every accessible fixture and appliance. Their findings go into a written report, which you can review, act on, and share with confidence.
How to prepare your home before the inspection day
Preparation is where sellers have the most control and where most sellers fall short. The goal is simple: give the inspector clear, unobstructed access to every system and area they need to evaluate.
Blocked access to mechanical systems forces the inspector to mark those areas as “not inspected,” which triggers buyer suspicion and often leads to re-inspections and delays. A note in the report saying “attic not accessible” raises more questions than a minor defect would. Clear the path before the inspector arrives.
Use this seller preparation checklist as your starting point:
Interior and systems access:
Move stored items away from the electrical panel, water heater, HVAC unit, and attic hatch
Unlock all interior doors, including utility closets and crawl space access points
Replace burned-out light bulbs throughout the home so the inspector can test every switch
Test all smoke detectors and carbon monoxide detectors, and replace batteries if needed
Leave all pilot lights lit and utilities turned on, including gas, water, and electricity
Functionality checks:
Run every faucet and check under sinks for active drips or moisture staining
Test the HVAC system in both heating and cooling modes before the inspection date
Operate all built-in appliances: dishwasher, range, oven, garbage disposal, and exhaust fans
Test garage door openers and leave remotes accessible for the inspector
Exterior preparation:
Clear gutters of debris and confirm downspouts direct water away from the foundation
Trim back shrubs and tree branches that touch the roofline or siding
Confirm the grading around the foundation slopes away from the home, not toward it
Make sure the inspector can access the roof safely from the ground or a ladder
Day-of logistics:
Remove or secure pets and arrange for them to be off the property during the inspection
Plan to be away from the home so the inspector can work without interruption
Leave any documentation for recent repairs, permits, or system upgrades on the kitchen counter
Pro Tip: Gather receipts, warranty cards, and photos for any work completed in the past five years. A new roof, HVAC service, or electrical upgrade documented with paperwork is worth far more in a buyer’s eyes than the same work done without records.
What do inspectors look for, and what issues should sellers expect?
Home inspectors evaluate your property against a defined standard of practice. InterNACHI, the International Association of Certified Home Inspectors, sets the benchmark most certified inspectors follow. Understanding what they examine helps you anticipate findings before the report arrives.
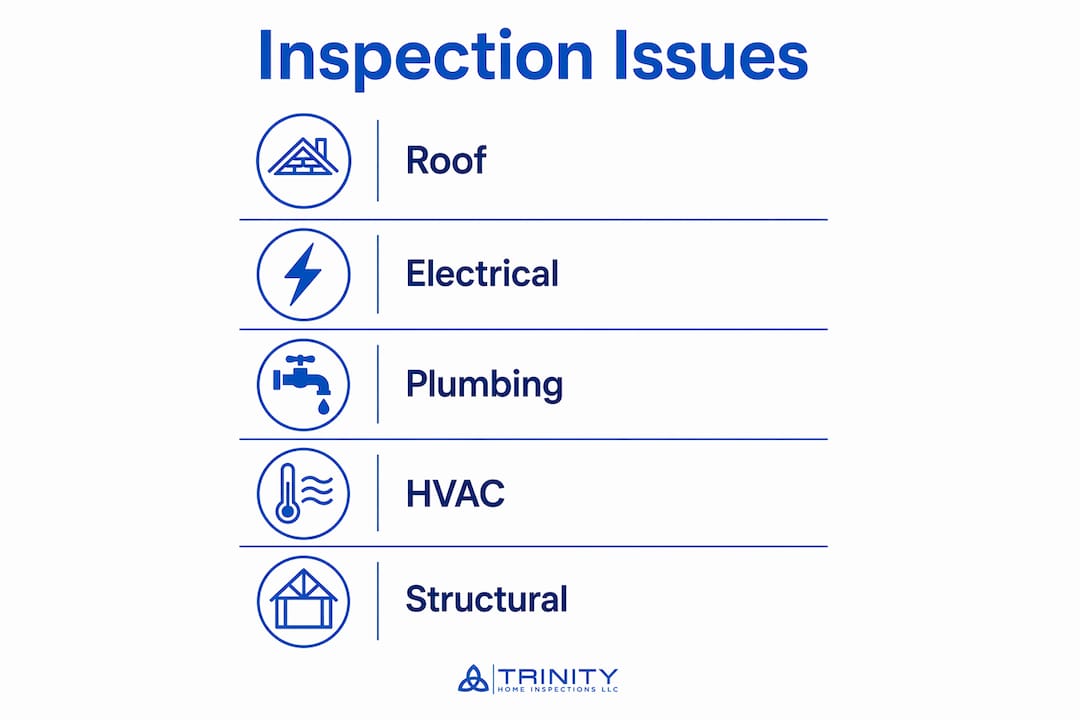
Here are the primary inspection categories and the most common issues found in each:
Inspection area | Common issues found |
Roof and attic | Missing or damaged shingles, inadequate ventilation, signs of past leaks |
Electrical system | Missing GFCI outlets in kitchens and bathrooms, double-tapped breakers, outdated panels |
Plumbing | Slow drains, leaking supply lines, water heater age or improper venting |
HVAC systems | Dirty filters, aging equipment, improper duct connections, thermostat failures |
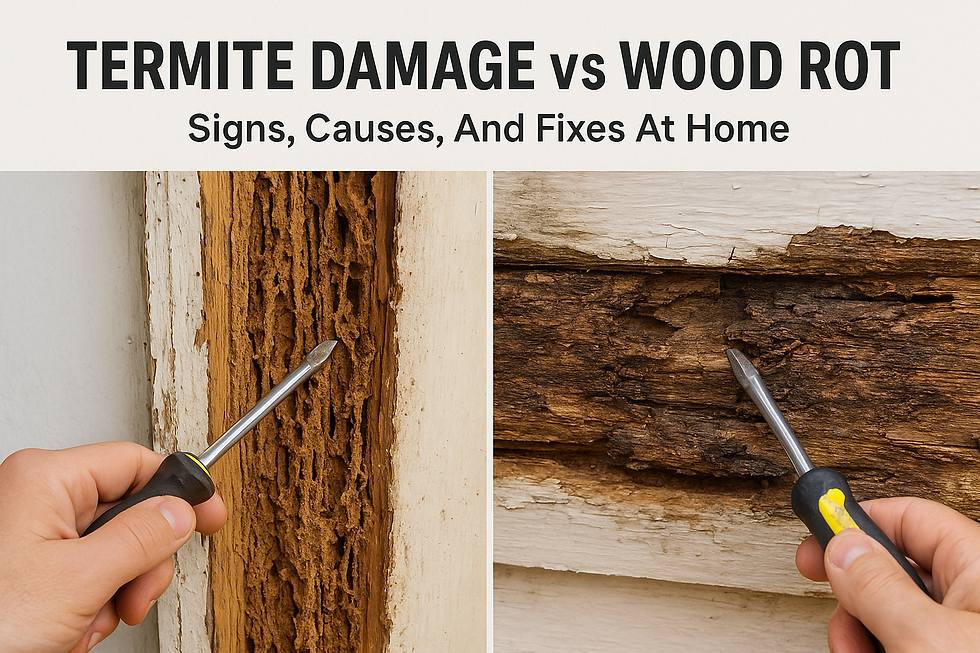
Foundation and structure | Cracks in masonry, evidence of settling, moisture intrusion in crawl spaces |
Windows and doors | Failed seals in double-pane glass, sticking doors, broken hardware |
Not every finding carries the same weight. Inspectors and real estate professionals distinguish between three categories of defects. Safety hazards, such as exposed wiring or a cracked heat exchanger, require immediate attention. Active system failures, like a non-functioning HVAC or a leaking roof, will almost certainly trigger buyer repair demands or price reductions. Cosmetic issues, such as scuffed paint or worn carpet, rarely affect negotiations in a meaningful way.
Experts consistently advise sellers to focus repair dollars on safety hazards and active system failures first. Spending $3,000 repainting a home that has a faulty electrical panel is a poor use of resources. Buyers and their inspectors will find the panel. They will not negotiate over paint.
Missing GFCI outlets are one of the most frequently cited issues in Gulf Coast Alabama homes, particularly in older properties in Mobile and Baldwin County. They cost under $20 per outlet to install and take a licensed electrician less than an hour to address. Fixing them before listing removes a line item that appears in nearly every buyer’s inspection report and gives buyers a reason to request credits.
How to prioritize repairs after you receive the inspection report
The inspection report arrives and it lists 30 items. Before you panic, understand that most inspection reports look long because inspectors are thorough by design. Your job is not to fix everything. Your job is to fix the right things.
Categorize every finding into three groups to make smart decisions:
Immediate safety repairs. These include items like faulty wiring, gas leaks, non-functional smoke detectors, and structural concerns. Fix these before listing, no exceptions. Leaving a known safety hazard unaddressed after receiving an inspection report creates legal exposure in most states, including Alabama.
Active system failures. A broken HVAC, a leaking roof, or a water heater past its service life will appear in every buyer’s inspection and will be used to negotiate price reductions or repair credits. Repair these if the cost is reasonable relative to your sale price. If the cost is high, get contractor quotes and factor them into your pricing strategy upfront.
Disclosure-only items. Cosmetic wear, minor cracks in drywall, and aging but functional systems fall here. You disclose them honestly, price accordingly, and move on. Spending money on low-return cosmetic fixes rarely recovers its cost in a higher sale price.
Document every repair with a paid invoice from a licensed contractor and before-and-after photos where possible. This documentation does two things. It proves the work was done professionally, and it gives your real estate agent concrete evidence to support your asking price during negotiations.
Work with your real estate agent to decide between completing repairs and offering credits. In a strong seller’s market, completing repairs before listing often yields a higher net price. In a slower market, offering a documented credit can move the transaction faster. Your agent knows the local dynamics. Let that knowledge guide the decision.
Pro Tip: For repairs you choose not to complete, get at least two contractor quotes and keep them on file. Presenting a buyer with a $1,200 quote for a repair they estimated at $5,000 is one of the most effective negotiation tools a seller has.
For a deeper look at which repairs deliver the best return, the home inspection repair guide from Trinity Home Inspections breaks down common Alabama findings by cost and impact.
How can sharing your inspection report help you sell faster?
Transparency is the most underused tool in a seller’s negotiation kit. Pre-listing inspections build buyer trust and consistently lead to faster sales because buyers feel less need to use the inspection contingency as a renegotiation lever.
When you share a completed pre-listing inspection report with prospective buyers, several things happen in your favor:
Buyers enter the transaction with known information rather than fear of the unknown, which reduces the likelihood of cold feet after their own inspection
Buyers who see documented repairs are less likely to request additional concessions for items already addressed
Your listing stands out in a competitive market because most sellers do not offer this level of transparency upfront
Buyers’ inspectors often confirm your findings rather than uncovering new ones, which keeps the transaction on schedule
Lenders and appraisers view a well-documented, pre-inspected property more favorably, which can reduce financing-related delays
Timing matters. Schedule your pre-listing inspection several weeks to months before your target listing date. This window gives you time to complete priority repairs, collect documentation, and price your home accurately from day one. Sellers who list without this preparation often face a price reduction after the buyer’s inspection, which is more damaging to your net proceeds than addressing issues proactively.
Common seller mistakes that delay closing include leaving utilities disconnected on inspection day, failing to disclose known issues that the inspector will find anyway, and attempting DIY repairs on systems that require licensed contractors. Each of these creates friction at exactly the wrong moment in the transaction. Avoiding them is straightforward with the right preparation.
For more on how a pre-listing inspection translates directly to a faster sale, the article on why pre-listing inspections help covers the data and the process in detail.
Key takeaways
A pre-listing home inspection is the most cost-effective step a seller can take to protect their sale price, reduce negotiation friction, and close on schedule.
Point | Details |
Schedule early | Book your inspection weeks before listing to allow time for repairs and accurate pricing. |
Clear all access points | Unobstructed access to HVAC, electrical panels, and crawl spaces produces a complete, credible report. |
Prioritize by category | Fix safety hazards and active failures first; disclose cosmetic issues rather than over-spending on them. |
Document every repair | Receipts and photos from licensed contractors justify your price and reduce buyer concession requests. |
Share the report | Proactive disclosure builds buyer confidence and reduces the chance of renegotiation after their inspection. |
What I’ve learned from inspecting homes before they list
After conducting pre-listing inspections across Mobile, Baldwin, and surrounding Gulf Coast Alabama counties, the pattern I see most often is this: sellers spend money in the wrong places and skip the things that actually matter to buyers and their inspectors.
I have walked into homes where the owner repainted every room and installed new light fixtures, but the electrical panel had double-tapped breakers and the crawl space had standing moisture. A buyer’s inspector will walk past the fresh paint and flag the panel and the crawl space every single time. The cosmetic work did not add value to the transaction. The unaddressed defects subtracted from it.
The sellers who get the best outcomes are the ones who treat the pre-listing inspection as a business decision, not a personal evaluation of their home. They read the report, triage the findings, fix what matters, document everything, and price with confidence. They do not try to hide anything, and they do not over-correct on things that do not move the needle.
One thing I tell every seller: access is everything. Inspectors rely on visual access to every major system. If I cannot get to your attic or your electrical panel, I have to note it as uninspected. That note costs you more in buyer anxiety than whatever was behind that door. Clear the path, and let the inspection do its job.
The sellers I work with in Daphne, Fairhope, Foley, and Spanish Fort who follow this process consistently report smoother closings and fewer surprises. That is not an accident. It is what preparation looks like in practice.
— Matt
Ready to list with confidence? Start with a pre-listing inspection
[

A pre-listing inspection from Trinity Home Inspections gives you the full picture before your home hits the market. Every inspection includes a same-day photo and video report, free thermal imaging, and plain-English priorities so you know exactly what to address and what to disclose.
What’s included with your pre-listing inspection:
Full evaluation of structure, roof, electrical, plumbing, and HVAC
Same-day digital report with color-coded findings (DIY, Issues, Safety)
Free thermal imaging to identify hidden moisture or insulation gaps
Trusted contractor referrals for any repairs needed
Post-inspection walkthrough by phone or in person
Trinity Home Inspections serves Baldwin County, Mobile County, Escambia County, and surrounding Gulf Coast Alabama communities. Schedule your pre-listing inspection today or use the property permit search tool to gather documentation before your inspection day.
Call 251-210-7376 or visit TrinityInspectionsLLC.com to get started.
FAQ
What is a seller’s home inspection checklist?
A seller’s home inspection checklist covers clearing access to all mechanical systems, testing HVAC and appliances, replacing burned-out bulbs, checking smoke and CO detectors, and gathering repair documentation. The goal is to give the inspector unobstructed access to every area so the report is complete and credible.
How much does a pre-listing inspection cost?
A pre-listing inspection typically costs between $300 and $500. Sellers who address the findings before listing avoid buyer concession requests in the majority of cases, making the inspection one of the highest-return investments in the selling process.
Should sellers fix everything on the inspection report?
No. Sellers should prioritize safety hazards and active system failures for repair, and disclose cosmetic or low-impact items rather than spending money on fixes that do not affect buyer decisions or sale price.
When should a seller schedule a home inspection?
Schedule your pre-listing inspection several weeks to months before your target listing date. This timeline allows you to complete priority repairs, collect contractor documentation, and set an accurate asking price before the first buyer walks through the door.
Can sellers share their inspection report with buyers?
Yes, and doing so is one of the most effective ways to build buyer confidence. Sharing a completed pre-listing report with documented repairs reduces the likelihood of renegotiation after the buyer’s own inspection and can shorten the time from offer to closing.
Recommended