
11-Month Warranty Inspection: What To Check Before It Expires
- Matt Cameron
- 6 hours ago
- 9 min read

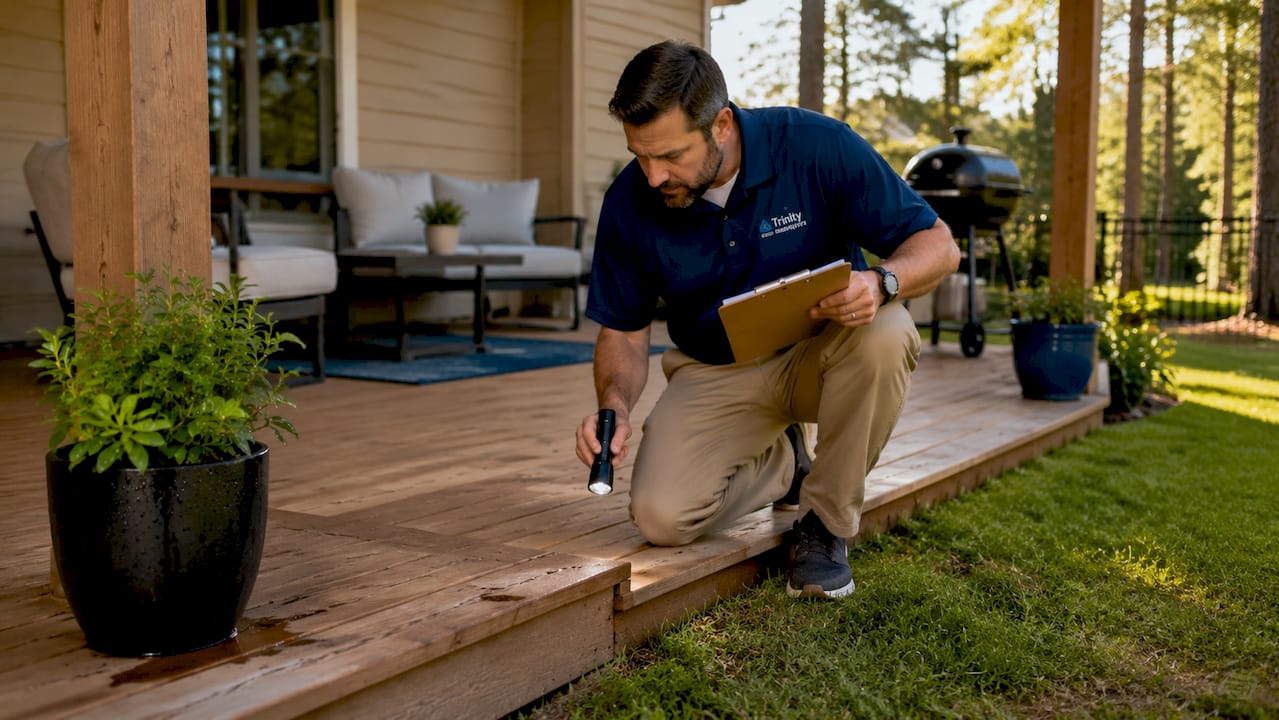
An 11-month warranty inspection is a professional evaluation of your new home conducted before your builder’s one-year workmanship warranty expires, designed to identify and document defects while coverage is still active. The industry term for this service is a “pre-warranty expiration inspection,” though most homeowners and inspectors call it the 11-month inspection. Missing this window means any defects discovered afterward become your financial responsibility, not the builder’s. Failing to report defects before expiration shifts liability permanently to you. A professional inspection at this stage is your best defense against repair costs that can run into thousands of dollars.
When is the best time to schedule your 11-month warranty inspection?
The right scheduling window is 30–60 days before your warranty expiration date. That window gives you time to receive the report, review the findings, and submit a formal repair request to your builder before the clock runs out. Scheduling between months 9 and 11 helps avoid last-minute bottlenecks that can delay your claim.

Calculating your expiration date is straightforward. Find your closing date or the date your certificate of occupancy was issued, then count forward 12 months. That is your deadline. Write it down and treat it like a legal filing date, because it functions exactly like one.
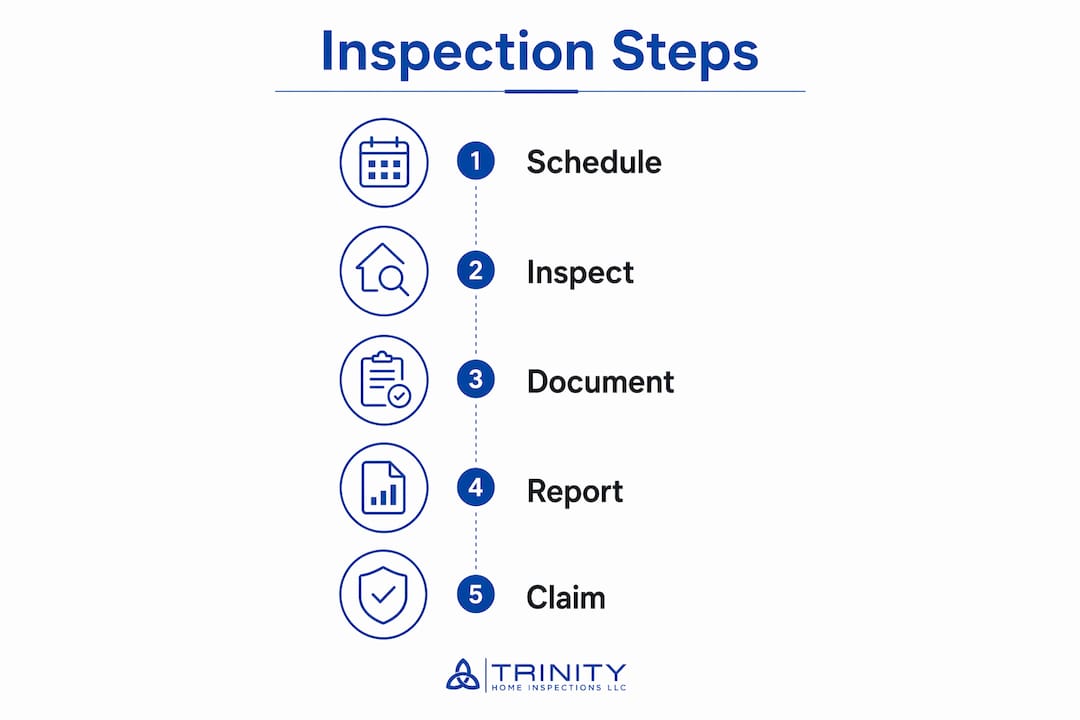
Here is a simple four-step process to stay on schedule:
Locate your closing documents. Find the date your builder warranty began. This is typically the closing date or the certificate of occupancy date.
Count back 60 days from expiration. Mark that date on your calendar as your scheduling target.
Set a calendar alert at the 10-month mark. A 10-month reminder gives you a 60-day window to book your inspector and submit claims comfortably.
Book your inspector immediately after the alert fires. InterNACHI-certified inspectors in high-demand areas like Baldwin County and Mobile can fill up quickly, especially in spring and summer.
Pro Tip: Set two calendar alerts: one at month 10 to book the inspector, and one at month 11 to confirm your repair request has been submitted to the builder in writing.
Homeowners who wait until month 11 to start the process often find themselves rushing. A rushed inspection leads to missed defects. A missed defect after expiration is a repair bill you pay out of pocket. Give yourself the full 60-day window and use every day of it.
What key areas should you check during the 11-month inspection?
Professional 11-month inspections often identify 30–80 defects including HVAC balancing issues, drywall cracks, and plumbing leaks. That range may surprise you, but new construction is not perfect construction. Builders work fast, subcontractors change, and small errors accumulate. Here is what a thorough builder inspection checklist covers:
Structural and foundation elements
Cracks in the foundation, slab, or brick veneer
Uneven floors or signs of settlement
Gaps between walls and ceilings or floors
Roofing and attic
Missing, lifted, or improperly sealed flashing around chimneys and vents
Shingle condition and ridge cap integrity
Attic ventilation and signs of moisture intrusion
HVAC systems
Airflow balance across all rooms (some rooms running hot or cold signals a duct issue)
Filter housing, drain pan condition, and condensate line flow
Thermostat calibration and system cycling behavior
Plumbing
Supply line connections under sinks and at toilets
Water heater pressure relief valve and connections
Slow drains or gurgling sounds that indicate venting problems
Doors, windows, and weatherstripping
Doors that stick, drag, or fail to latch cleanly
Window seals showing fogging between panes (failed seal)
Gaps in weatherstripping that allow air or water infiltration
Drainage and grading
Soil grading that slopes toward the foundation instead of away from it
Downspout extensions that terminate too close to the home
Standing water near the foundation after rain
Electrical systems
GFCI outlets in bathrooms, kitchens, garages, and exterior locations
AFCI breakers in living areas and bedrooms
All outlets, switches, and fixtures tested for proper function
Common defects found include drywall nail pops, foundation settlement signs, HVAC airflow issues, door and window misalignment, roof flashing problems, and drainage concerns. Most are minor individually. Together, they form a repair list your builder is obligated to address under warranty.
Area | What to look for | Covered under warranty? |
Foundation | Cracks, settlement, uneven floors | Yes, typically under 10-year structural |
Roof flashing | Lifted or missing flashing, leaks | Yes, under 1-year workmanship |
HVAC airflow | Unbalanced rooms, poor drainage | Yes, under 2-year mechanical |
Plumbing | Leaks, slow drains, supply line issues | Yes, under 1 or 2-year coverage |
Electrical | Non-functional GFCI, loose outlets | Yes, under 1-year workmanship |
Pro Tip: Moisture intrusion is the defect most likely to cause long-term damage. If your inspector uses thermal imaging, it can reveal hidden moisture behind walls before it becomes a mold problem. Trinity Home Inspections includes thermal imaging at no extra charge.
How to prepare for and conduct the inspection effectively
Hiring the right inspector makes the difference between a useful report and a missed opportunity. A professional experienced in new construction knows what builders commonly cut corners on and how to document defects in language that builders and warranty departments take seriously.
Here is what to look for when selecting your inspector:
InterNACHI certification. The International Association of Certified Home Inspectors sets the gold standard for training and ethics in the industry.
New construction experience. Ask directly whether the inspector has performed 11-month warranty inspections before. This is a different skill set than a standard buyer’s inspection.
Same-day reporting. You need the report quickly to meet your claim deadline. Inspectors who deliver reports within 24 hours are the minimum standard. Same-day delivery is better.
Photo and video documentation. A report with clear photos tied to each defect is far more persuasive to a builder’s warranty department than a written description alone.
Tools beyond the basics. Thermal imaging cameras, moisture meters, combustible gas detectors, and drones for roof access all increase the depth of what gets found.
A DIY walkthrough is not a substitute for a professional inspection. You can spot a sticking door or a nail pop. You cannot measure HVAC airflow balance, detect moisture behind drywall with a thermal camera, or write a report that references International Residential Code deficiencies. That last point matters more than most homeowners realize.
“Builder warranty departments prioritize defect reports citing code deficiencies over casual homeowner reports when scheduling repairs.” — How To Take Advantage Of Your Builder Home Warranty
A professional inspector produces documentation that speaks the builder’s language. That documentation increases the likelihood your repair requests get scheduled and completed. Attend the inspection if you can. Walking through the home with the inspector gives you context that a written report alone cannot provide.
How to use the inspection report to maximize your warranty claims
Builder warranties follow a 1-2-10 year structure covering workmanship for one year, mechanical systems for two years, and structural defects for ten years. Claims filed after each coverage tier expires are typically denied. Knowing which defects fall under which tier helps you prioritize your repair requests correctly.
Follow these steps to submit claims effectively:
Review the report the same day it arrives. Identify every defect and note which warranty tier applies. Workmanship items like drywall, paint, and trim fall under year one. HVAC and plumbing mechanical issues fall under year two.
Submit a written repair request to your builder’s warranty department. Email is better than a phone call because it creates a time-stamped record. Include the inspection report and photos as attachments.
Reference specific defects by location and description. “Master bathroom GFCI outlet non-functional” is more useful than “some outlets don’t work.” Specificity signals that you have professional documentation behind the claim.
Set a follow-up date. Give the builder 10–14 days to respond, then follow up in writing if you have not heard back. Keep every email in a dedicated folder.
Escalate professionally if needed. If the builder denies a legitimate claim, reference the warranty agreement language and the inspection report together. If the dispute continues, contact your state’s contractor licensing board or consult a real estate attorney.
Formal documentation increases builder responsiveness compared to informal homeowner reports. Builders respond faster when they see a report that cites code deficiencies and includes photo evidence. A professional inspector produces exactly that kind of documentation.
Pro Tip: Keep a physical and digital copy of your warranty agreement, your inspection report, and every piece of correspondence with your builder. If a dispute arises months later, that paper trail is your strongest asset.
Dealing with builder pushback is common. Builders may claim a defect is normal settling or cosmetic wear. Your inspector’s report, especially one that references IRC standards, gives you the standing to push back with confidence. A photo-documented report explains why an item is a defect, not just what it is. That distinction is what turns a denied claim into a scheduled repair.
Key Takeaways
An 11-month warranty inspection is the single most effective step a new-home owner can take to protect their investment before builder coverage expires.
Point | Details |
Schedule early | Book your inspection 30–60 days before expiration to allow time for claims. |
Know your coverage tiers | Builder warranties cover workmanship for 1 year, mechanical for 2 years, and structural for 10 years. |
Use professional documentation | Reports citing IRC deficiencies get faster builder responses than informal homeowner lists. |
Check all major systems | Inspect foundation, roof, HVAC, plumbing, electrical, drainage, and all doors and windows. |
Submit claims in writing | Email repair requests with the full report attached and keep every response on file. |
What I’ve learned after inspecting hundreds of new construction homes
I have walked through a lot of new builds across Baldwin County, Mobile, and the surrounding Gulf Coast area. The pattern I see most often is not a dramatic structural failure. It is a homeowner who waited too long, did a quick walkthrough on their own, and submitted a vague list to the builder. The builder’s warranty department responded slowly or not at all. The warranty expired. The repairs became the homeowner’s problem.
The uncomfortable truth about builder warranties is that builders benefit from homeowner inaction. The warranty is real, but it only protects you if you use it correctly and on time. A casual list of complaints does not carry the same weight as a formal report from an InterNACHI-certified inspector that references specific code standards and includes thermal images of moisture behind a wall.
What I tell every new-build owner is this: your inspector is not just finding defects. Your inspector is building your legal and financial case. The report we produce at Trinity Home Inspections is written to be understood by a builder’s warranty department, not just by you. That is a meaningful difference.
The other thing homeowners consistently underestimate is drainage and grading. It looks fine when the yard is dry. After a Gulf Coast rainstorm, improper grading sends water toward your foundation. By the time you notice moisture in a crawl space or a musty smell in a bedroom, the warranty has often expired. Catching grading issues at month 11 is a five-minute conversation with your builder. Catching them at year three is a landscaping and waterproofing project you pay for yourself.
Act early. Document everything. Hire a professional who knows how to write a report that gets results.
— Matt
Trinity Home Inspections is ready for your warranty inspection
Your builder warranty has a hard deadline. Trinity Home Inspections provides InterNACHI-certified 11-month warranty inspections across Mobile, Baldwin, Daphne, Fairhope, Spanish Fort, Foley, Gulf Shores, Orange Beach, and surrounding Gulf Coast Alabama communities.
[

What’s included with every 11-month warranty inspection:
Full evaluation of structural, roofing, HVAC, plumbing, electrical, and drainage systems
Free thermal imaging to detect hidden moisture and insulation gaps
Same-day, photo and video-rich report organized for builder warranty submission
Color-coded findings sorted by severity for easy review
Post-inspection walkthrough by phone or in person so you know exactly what to submit
If moisture concerns come up during the inspection, Trinity also offers mold inspection services to give you a complete picture before your warranty closes. Schedule your inspection today at TrinityInspectionsLLC.com or call 251-210-7376.
FAQ
What is an 11-month warranty inspection?
An 11-month warranty inspection is a professional home evaluation performed before a builder’s one-year workmanship warranty expires. It identifies defects covered under warranty so homeowners can submit repair requests before coverage ends.
How long do builder warranties typically last?
Builder warranties follow a 1-2-10 structure: one year for workmanship, two years for mechanical systems like HVAC and plumbing, and ten years for structural defects. Claims submitted after each tier expires are typically denied.
Can I do the inspection myself instead of hiring a professional?
A DIY walkthrough can catch visible issues, but professional inspectors produce reports that cite code deficiencies and include thermal imaging, which builders respond to far more readily than informal homeowner lists.
What defects are most commonly found during a warranty inspection?
Common defects include drywall nail pops, HVAC airflow imbalances, roof flashing issues, plumbing leaks, door and window misalignment, and improper drainage grading. Most are minor but require documentation to be covered under warranty.
When should I schedule my 11-month warranty inspection?
Schedule between months 9 and 11 of your warranty period, ideally 30–60 days before expiration. That window gives you time to receive the report and submit a formal repair request before your coverage ends.
Recommended

