
How to Make PEX Plumbing Repair: A Simple DIY Guide
- Matt Cameron

- Feb 19
- 8 min read
A sudden leak in your PEX pipes can disrupt your day and threaten your property’s value in Baldwin or Mobile County. Tackling repairs yourself is a smart way to cut costs while keeping your home in top shape. By gathering the right tools, safety gear, and following careful steps, you gain confidence and control over your plumbing system. This guide explains each stage of a DIY PEX repair, emphasizing critical safety practices and precision techniques for lasting results.
Quick Overview
Key Takeaway | Explanation |
1. Gather essential tools | Use a PEX pipe cutter, crimping tool, and safety gear to ensure efficient and safe repair work. |
2. Shut off water supply | Always turn off the main water valve before starting repairs to prevent flooding and ensure safety. |
3. Carefully cut damaged pipe | Create clean, square cuts to avoid future leaks when removing defective sections of PEX pipe. |
4. Install new PEX correctly | Align pipes and fittings properly, and make sure to secure connections tightly to prevent leaks. |
5. Conduct thorough leak testing | After repairs, check for leaks by restoring water pressure gradually and monitoring for moisture. |
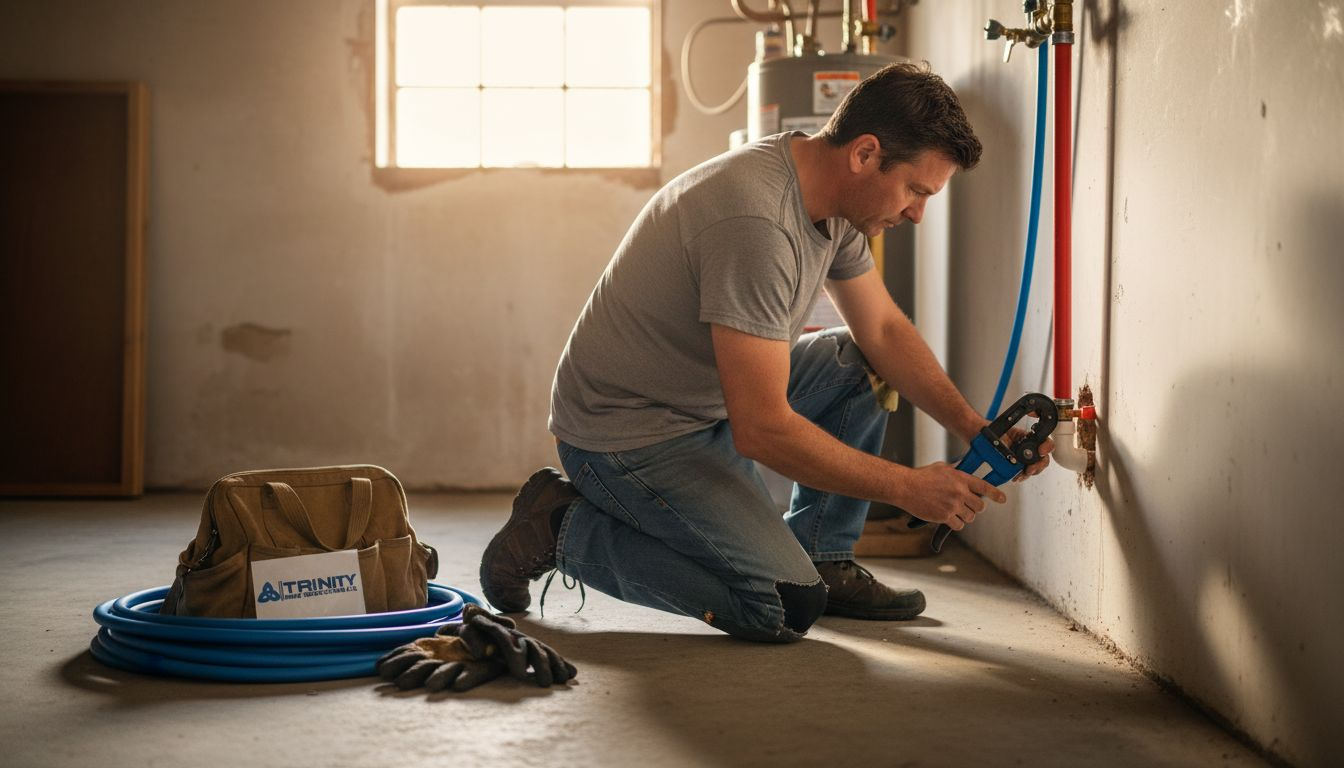
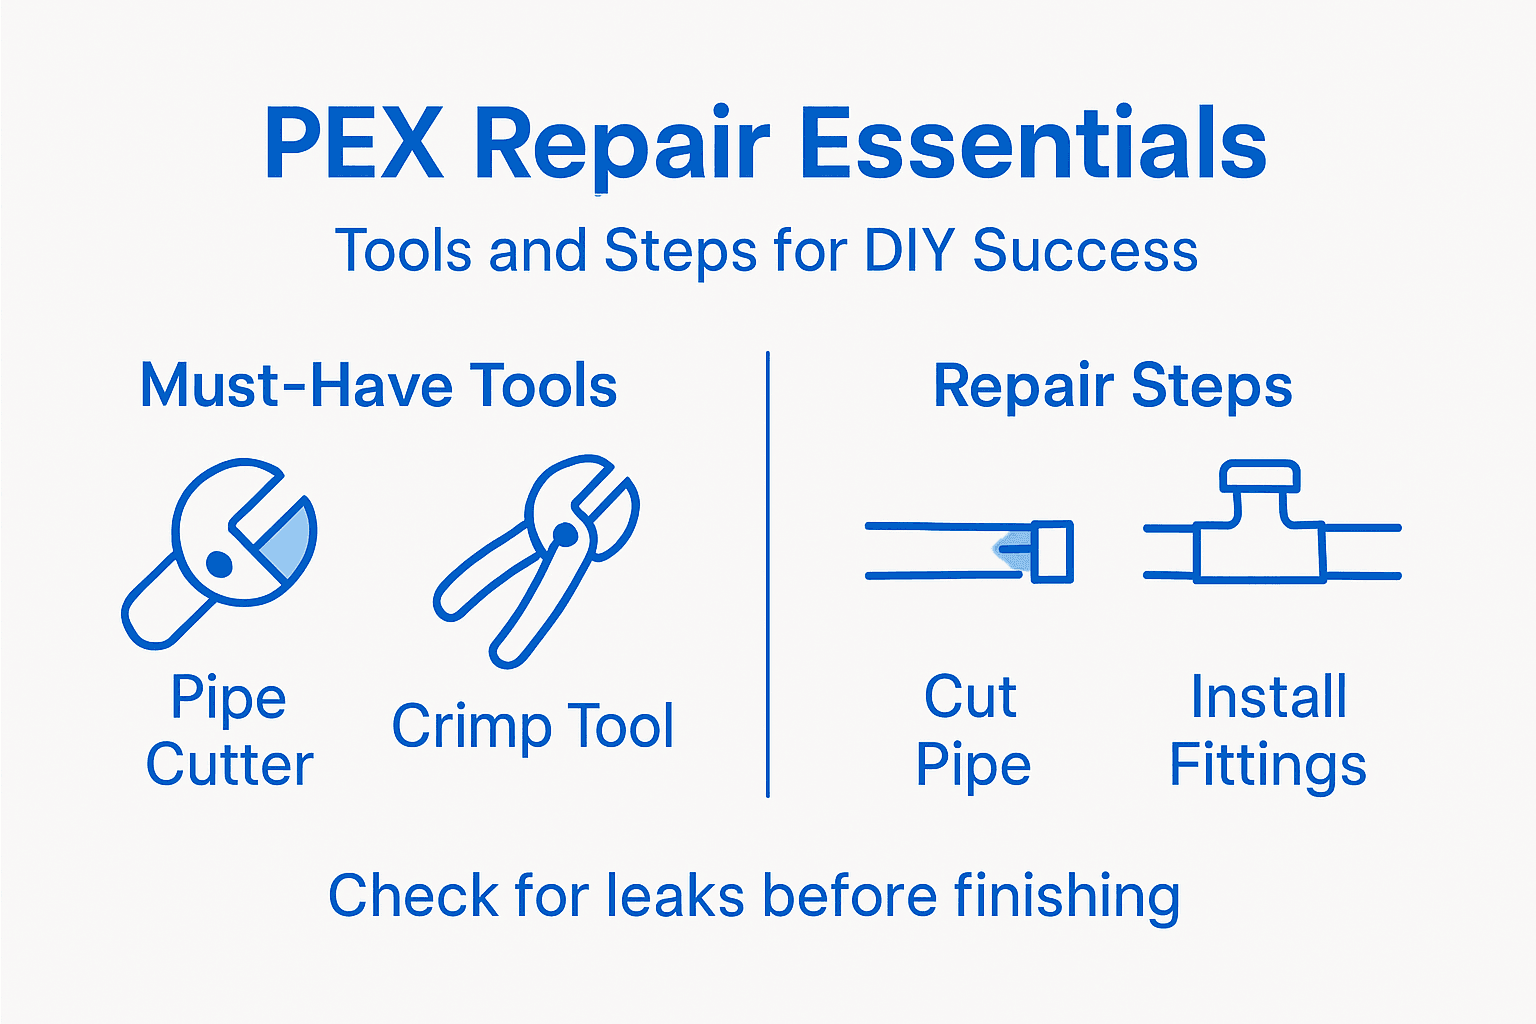
Step 1: Gather Tools and Safety Gear
Before diving into your PEX plumbing repair, gathering the right tools and safety equipment is crucial for a smooth, safe project. Proper tool preparation ensures you can complete the repair efficiently and protect yourself from potential accidents.
Here are the essential tools and safety gear you’ll need:
PEX pipe cutter for clean, precise cuts
Crimping tool specifically designed for PEX connections
Calibration gauge to verify crimp sizes
Measuring tape
Marker or pencil
Adjustable wrench
For personal safety, make sure you have the following protective equipment:
Safety glasses to protect your eyes from debris
Work gloves to shield your hands during cutting and crimping
Closed-toe shoes to prevent foot injuries
Long pants to protect your legs
Always inspect your tools before use to ensure they’re in good working condition and free from damage.
Each piece of equipment plays a critical role in your repair. The PEX pipe cutter will help you make clean cuts without damaging the pipe, while the crimping tool ensures secure, leak-free connections. Safety precautions are essential to prevent accidents during your DIY project.
Pro tip: Keep a small first aid kit nearby and ensure your workspace is well-lit and free from clutter to minimize the risk of accidents.
This table highlights key differences between PEX and traditional copper pipe repairs:
Factor | PEX Pipe Repair | Copper Pipe Repair |
Required Tools | Crimp tool, pipe cutter | Soldering torch, pipe cutter |
Connection Method | Mechanical crimping | Soldering/brazing |
Typical Repair Time | 30–60 minutes | 1–2 hours |
Safety Concerns | Eye/hand protection | Fire, burns, fume inhalation |
Step 2: Shut Off Water and Locate Leak
Before tackling any PEX plumbing repair, you need to stop water flow and precisely identify the problem area. Leak detection techniques are crucial for minimizing water damage and focusing your repair efforts effectively.
First, locate your home’s main water shutoff valve. This is typically found in one of these areas:
Basement
Crawl space
Near the water heater
Outside near the foundation
Garage
To shut off the water, turn the valve clockwise until it stops. This completely halts water flow to your entire house, ensuring a safe working environment. After shutting off the main valve, open a few faucets to release any remaining water pressure and confirm the water is fully stopped.
A small leak can waste hundreds of gallons of water if left unaddressed.
To locate the specific leak, look for these telltale signs:
Water stains on walls or ceilings
Damp spots on floors or near pipes
Unexplained increase in water bill
Sounds of running water when no fixtures are in use
Carefully inspect the area around the suspected leak, checking for moisture, discoloration, or puddles. PEX pipes might show subtle signs of damage that require close examination.
Pro tip: Use a flashlight and dry paper towels when inspecting pipes to help you detect even the smallest moisture traces more effectively.
Step 3: Cut and Remove Damaged PEX Section
Now that you’ve located the leak, it’s time to precisely remove the damaged section of PEX pipe. Dura PEX plumbing risks can vary, so careful removal is crucial to prevent further damage.
Prepare your workspace by ensuring you have these essential tools:
PEX pipe cutter
Measuring tape
Marker
Work gloves
Safety glasses
Follow these steps to remove the damaged pipe section:
Mark the cutting points approximately 1-2 inches beyond the damaged area on both sides
Measure twice to confirm precise cutting locations
Position the PEX pipe cutter perpendicular to the pipe
Apply firm, steady pressure to make a clean, square cut
A clean, straight cut is essential for a proper PEX pipe repair.
When cutting PEX pipes, remember these critical techniques:
Always use a dedicated PEX pipe cutter
Avoid using hacksaws or utility knives
Ensure cuts are perfectly square and clean
Remove any burrs or rough edges after cutting
After cutting, carefully remove the damaged pipe section and inspect the surrounding area for additional signs of wear or potential future issues.
Pro tip: Keep your cuts precise and clean by using a specialized PEX pipe cutter and maintaining a steady hand throughout the process.
Step 4: Install New PEX Pipe and Fittings
With the damaged section removed, you’re ready to install a fresh piece of PEX piping. How to replace Durapex plumbing pipes requires precision and careful selection of the right materials and tools.
Gather these essential materials before beginning:
PEX pipe matching the diameter of your existing pipe
PEX coupling fittings
Crimp rings
Crimp tool
Pipe measuring tape
Deburring tool
Follow these detailed installation steps:
Measure the replacement pipe precisely
Clean pipe ends to remove any debris or rough edges
Slide crimp rings onto each pipe end
Insert coupling fittings into pipe ends
Position pipes to align perfectly
Use crimp tool to secure rings tightly
Proper alignment and tight crimping prevent future leaks and ensure a durable repair.
When installing PEX fittings, keep these critical techniques in mind:
Ensure 90-degree perpendicular cuts
Clean pipe ends thoroughly
Fully insert fittings before crimping
Check crimp ring placement is uniform
Verify pipe connection is secure
Carefully inspect your work, making certain no gaps or misalignments exist that could compromise the pipe’s integrity.
Pro tip: Practice your crimping technique on scrap pieces before working on your actual repair to build confidence and precision.
Step 5: Secure Connections and Clamp Fittings
Your PEX repair now enters a critical phase: securing the pipe connections to ensure a watertight seal. PEX connection standards require precise technique and specialized tools to prevent future leaks.
Essential tools for this step include:
Stainless steel crimp rings
Calibrated crimping tool
Depth gauge
Measuring calipers
Marker
Follow these precise connection steps:
Position crimp ring 1/8 to 1/4 inch from pipe end
Align fitting completely inside the pipe
Center crimp ring over fitting shoulder
Apply crimping tool with consistent pressure
Rotate 360 degrees during crimping
Verify crimp ring is uniformly deformed
Proper crimping creates a permanent, leak-resistant connection that will withstand water pressure.
Critical crimping techniques to remember:
Maintain consistent crimping pressure
Rotate tool completely around fitting
Check crimp ring orientation
Inspect each connection after crimping
Avoid over-tightening which can damage pipe
Carefully examine each connection, ensuring smooth, even crimping without gaps or irregularities.
Pro tip: Practice your crimping technique on spare pipe sections to develop muscle memory and achieve consistent, professional-quality connections.
Step 6: Test for Leaks and Restore Water Flow
With your PEX repair complete, it’s time to verify the repair’s integrity and restore water service. Pressure testing standards are crucial for ensuring a reliable, leak-free connection.
Prepare for leak testing with these essential items:
Pressure gauge
Garden hose
Towels or rags
Flashlight
Notebook for documentation
Follow these systematic leak testing steps:
Close all faucets in the repaired section
Gradually restore water pressure
Observe connections for immediate signs of moisture
Monitor pressure gauge for unexpected drops
Wait 15-20 minutes to confirm stability
Inspect entire repaired section
A successful leak test means zero pressure loss and completely dry connections.
Key techniques for thorough leak detection:
Use bright lighting during inspection
Check multiple angles around connections
Feel for moisture with clean, dry hands
Listen for subtle hissing sounds
Document your findings
Once you confirm no leaks exist, you can confidently restore full water flow to your plumbing system.
Pro tip: Perform leak testing during daylight hours and wear light-colored clothing to help detect even the smallest moisture traces more effectively.
Here’s a quick reference for PEX pipe repair steps and their main risks if skipped:
Step | Key Purpose | Main Risk if Skipped |
Tool & Safety Gear Prep | Ensures efficient, safe work | Injury or incomplete repair |
Shutting Off Water & Leak Location | Prevents water damage | Flooding, missed leaks |
Cutting Damaged Pipe Section | Removes all faulty piping | Recurring leaks or failures |
Installing New Pipe & Fittings | Restores full function | Weak joints, improper alignment |
Securing Connections & Clamping | Guarantees watertight seal | Loose fittings, future leaks |
Leak Testing & Water Restoration | Confirms durable repair | Undetected leaks, water loss |
Protect Your Home with Expert Inspection After Your PEX Plumbing Repair
Tackling a DIY PEX plumbing repair can save you time and money but also comes with risks like missed leaks or improper fittings. Key steps in your repair, such as leak detection, securing connections, and testing water pressure, require careful attention to avoid costly damage and water waste. Ensuring your repair is done right takes both skill and the right tools but even then hidden damage can go unnoticed.

Before you restore water flow or cover your repairs, make sure your home is truly safe and secure. With Trinity Home Inspections, you get InterNACHI-certified professionals armed with advanced thermal imaging and moisture meters to uncover hidden leaks or faults your DIY project might have missed. We deliver same-day, easy-to-understand reports so you can make smart decisions and avoid future headaches. Don’t wait for water damage to surface. Protect your investment now with trusted home inspection services tailored to your needs. Visit us at Trinity Home Inspections to schedule your inspection and gain the confidence your home deserves.
Frequently Asked Questions
What tools do I need for PEX plumbing repair?
To complete a PEX plumbing repair, you’ll need a PEX pipe cutter, crimping tool, calibration gauge, measuring tape, and an adjustable wrench. Gather these tools to ensure you can efficiently and safely carry out the repair.
How do I shut off the water before making a PEX repair?
Locate your home’s main water shutoff valve, usually found in the basement, crawl space, or near the water heater. Turn it clockwise until it stops, then open a few faucets to release any remaining water pressure before starting your repair.
What steps should I follow to cut damaged PEX pipe?
Mark the cutting points on the PEX pipe about 1-2 inches beyond the damaged area. Then, use a PEX pipe cutter to make clean, square cuts, making sure to avoid using tools like hacksaws or utility knives to ensure a proper fit for the new section.
How do I install new PEX pipe and fittings?
To install new PEX pipe, first measure and cut a replacement piece that matches the diameter of your existing pipe. Slide crimp rings onto each end, insert coupling fittings, and use a crimping tool to secure the connections tightly for a leak-free result.
How can I test for leaks after the PEX repair?
After completing your repair, gradually restore water pressure and observe all connections for any signs of moisture. Monitor the pressure gauge for unexpected drops and inspect the repaired section for about 15-20 minutes to ensure no leaks are present.
What safety gear should I wear during PEX plumbing repairs?
Always wear safety glasses to protect your eyes, work gloves to shield your hands, and closed-toe shoes to prevent foot injuries. Long pants are also recommended to safeguard your legs during the cutting and crimping process.
Recommended