
How to Remove a Tub Drain: Step-by-Step for Homeowners
- Matt Cameron

- Feb 23
- 9 min read

No one wants a simple tub drain project in Gulf Shores to turn into a messy hassle. Tubs get plenty of use along the Alabama coast and a clogged or worn out drain can mean water damage, bad odors, or even mold growth if left unchecked. With the right tools and a clean, organized workspace, you can remove a tub drain safely and confidently without the frustration that comes from missing steps or supplies. Get ready to tackle the job with clear instructions designed for homeowners who like to handle repairs themselves.
Quick Summary
Key Point | Explanation |
1. Gather essential tools first | Collect the necessary tools before starting to prevent frustration and save time during the project. |
2. Prepare your workspace properly | Keep the area clean and organized, ensuring tools and towels are within reach to avoid delays and mess. |
3. Remove the drain cover carefully | Take your time to loosen any tape or caulk gently, preventing damage to the drain or surrounding area. |
4. Inspect the drain opening thoroughly | Look for signs of damage or blockages, which helps determine if repair or replacement is needed. |
5. Clean around the drain before reinstallation | Ensure the area is clean and dry for a proper fit and to avoid future issues like rust or leaks. |
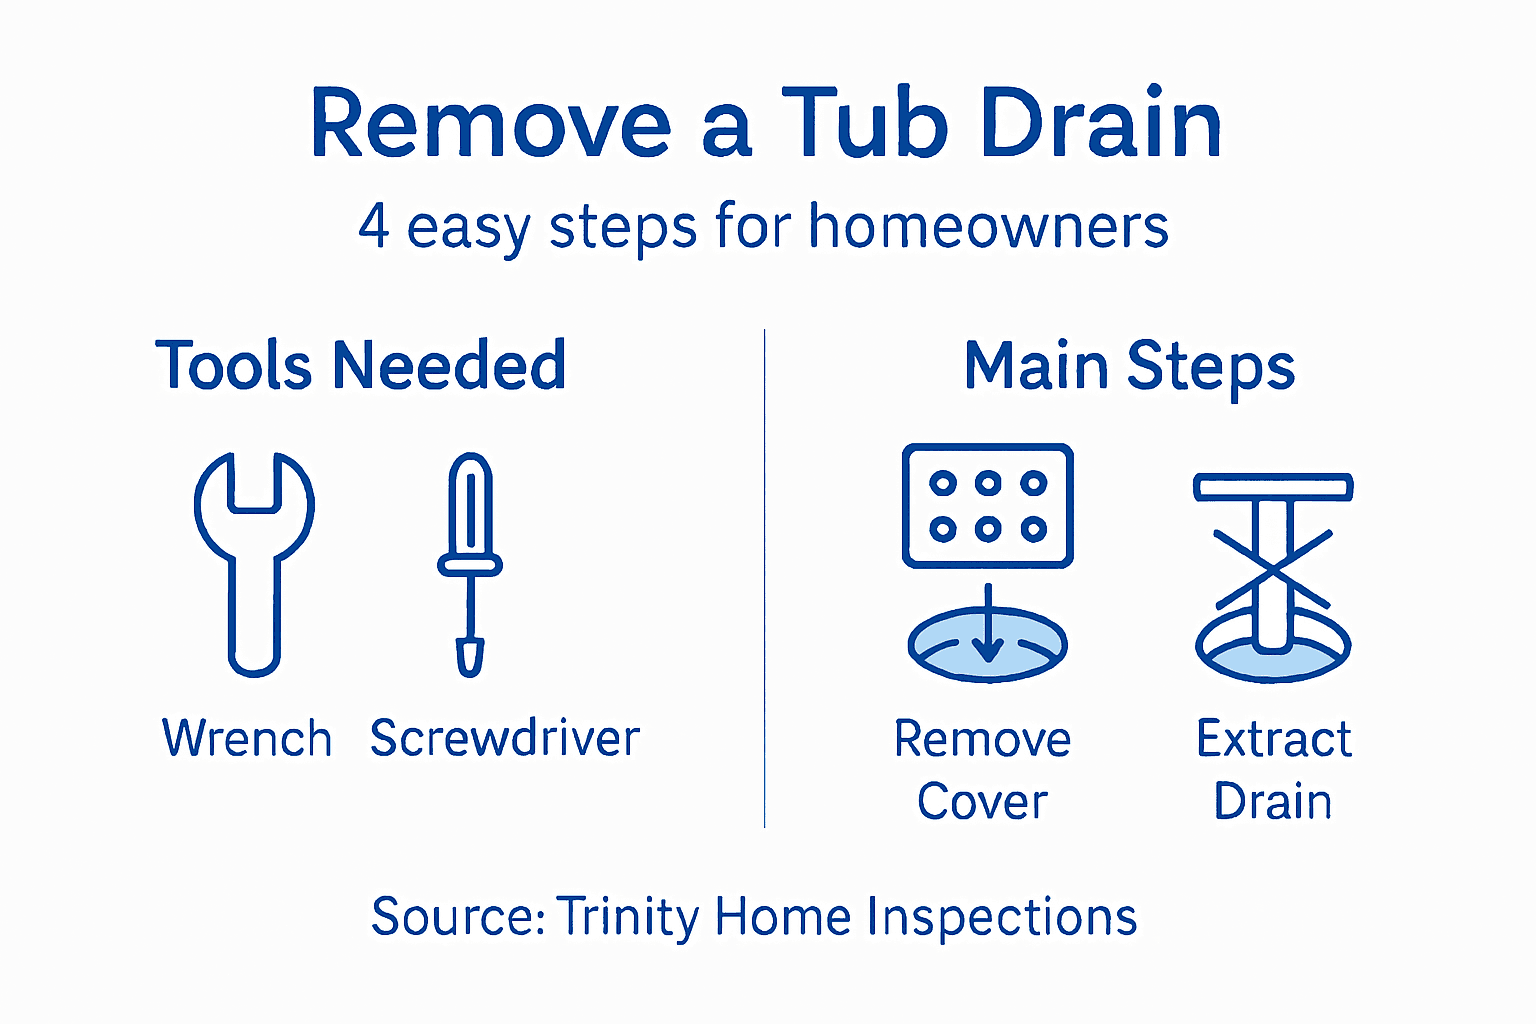
Step 1: Gather Essential Tools and Prepare the Area
Before you touch anything near your tub drain, stop and gather what you need. Working without the right tools and a clean workspace is how small jobs turn into frustrating problems. Taking 10 minutes now to set up properly saves you time and prevents mess later.
Start by assembling your basic toolkit. You’ll need a few standard items on hand:
Adjustable wrench or pipe wrench (for loosening connections)
Screwdrivers (both Phillips and flathead)
Flashlight or headlamp (you’ll be working in tight spaces)
Pliers or channel locks (for gripping and turning)
Bucket or towels (water will spill, guaranteed)
Wire brush or old toothbrush (for cleaning stubborn debris)
Putty knife or small pry tool (for gentle loosening)
If you’re dealing with a drain that has been caulked or sealed, grab a caulk removal tool or utility knife as well. Sometimes the drain is held in place by more than just gravity and connections.
Now prepare your work area properly. Clear the bathroom of clutter around the tub and lay down towels to catch any water that drains when you disconnect lines. Check that your workspace is clean and organized, as proper drain care preparation prevents complications and makes the job safer. Have good lighting—a flashlight pointed into the drain area makes a real difference in seeing what you’re working with.
Wash your hands thoroughly before starting. This keeps debris out of your work and protects your skin from any gunk inside the drain. If you’re dealing with old drains that might have rust or mold growth, consider wearing nitrile gloves for added protection.
Set up your workspace so everything you need is within arm’s reach. Place your tools on a small towel near the tub so you’re not scrambling to find them mid-job. Position your bucket underneath any connections you’ll be loosening, even if you think water won’t drip—it always does.
Here’s a quick guide to workspace setup versus common mistakes in tub drain projects:
Setup Aspect | Proper Preparation | Common Mistake | Impact |
Tool Placement | Tools organized near tub | Tools scattered or missing | Delays and frustration |
Lighting | Flashlight/headlamp used | Dim or no extra light | Hard to see, missed issues |
Floor Protection | Towels/bucket in place | No protection | Water spills, slips |
Cleanliness | Hands washed, gloves used | No hand washing | Increased mess, possible skin irritation |
Clutter Control | Bath area cleared | Items left nearby | Hard to move, risk of lost parts |
Having the right tools within reach and a clean, well-lit workspace cuts your project time in half and prevents frustration.
Pro tip: _Lay out your tools in the order you’ll use them, left to right, so your hands know where to reach without looking away from the drain.
Step 2: Loosen and Remove the Drain Cover
The drain cover is your access point to everything underneath. Before you can work with the drain itself, you need to carefully remove whatever is holding the cover in place. This step requires patience and a gentle touch to avoid damaging the drain or surrounding area.
Start by washing your hands thoroughly. This keeps bacteria and debris away from the drain opening once you expose it. Then examine what’s securing the cover. Most drain covers are held down by tape, caulk, or both. Take a moment to see exactly what you’re dealing with.
Begin loosening the tape or dressing carefully. Use your fingers or a plastic scraper to gently lift one edge at a time. Removing drain dressing without pulling on the drain tube itself prevents injury and keeps the drain from shifting. Work slowly from all sides rather than yanking on one corner. The goal is to peel, not pull.
If the cover is caulked in place, use your caulk removal tool or utility knife to score around the edges first. This breaks the seal without forcing the cover suddenly. Once you’ve loosened the tape and caulk, gently lift the drain cover away from the tub. You may see water or residue underneath, which is normal.
As you remove the cover, look at the drain area beneath it. Check for any signs of rust, corrosion, or debris buildup. This gives you a preview of what you’ll be working with in the next steps. Dispose of the old tape and dressing properly.
Keep the drain accessible now that the cover is off. Don’t set it aside where you’ll kick it or accidentally cover the drain again. You may need to reference how it was positioned when you reinstall it later.
Patience during this step prevents damage to the drain and makes the rest of the job much smoother.
Pro tip: Heat from a hair dryer softens old tape and caulk, making them peel away more easily without excessive scraping.
Step 3: Unscrew and Extract the Tub Drain
Now comes the core of the job. You need to carefully disconnect the drain from whatever is holding it in place and pull it out. This step demands a steady hand and patience because rushing leads to bent pipes or stripped threads that create bigger problems.
Locate the connection point where the drain attaches to the drain body or overflow pipe. Most residential tub drains use a threaded connection that screws in or out. Examine it closely to understand which direction to turn. Counterclockwise loosens almost everything, but verify before you apply force.
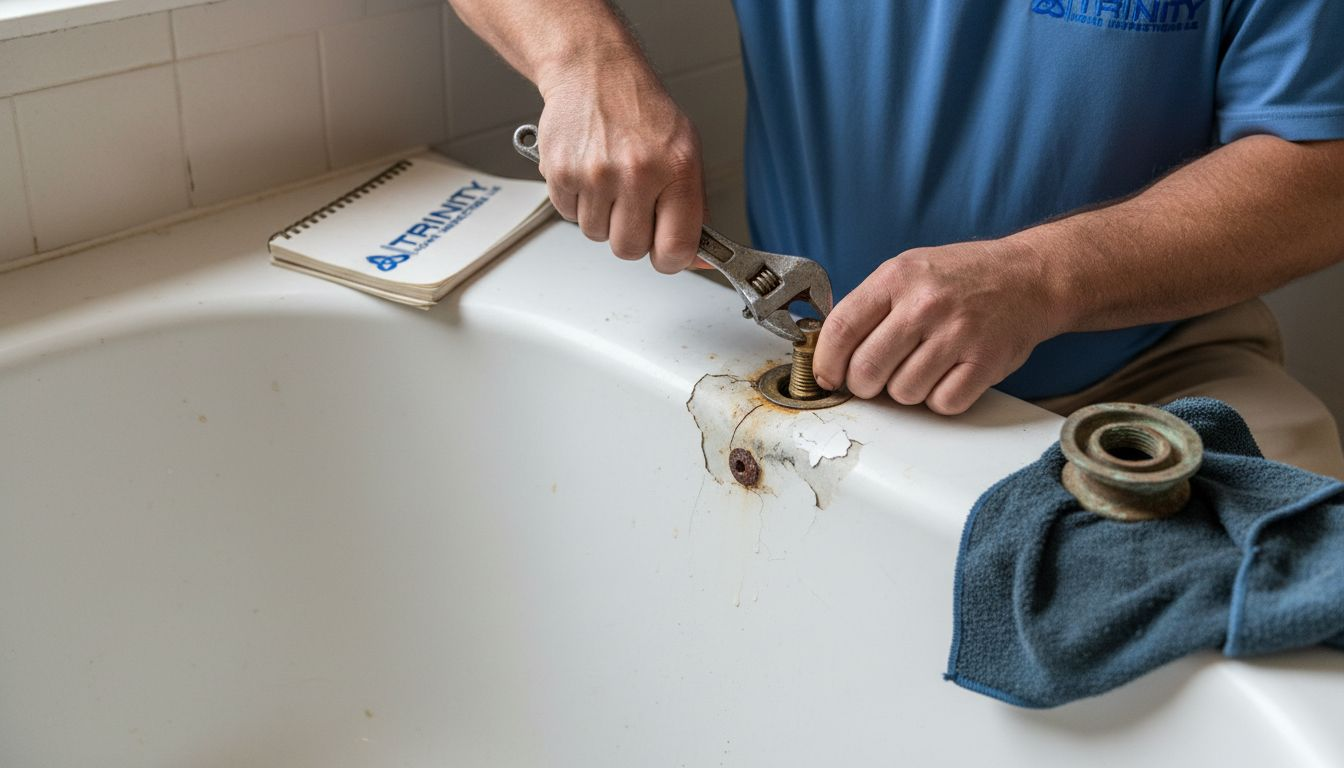
Use your adjustable wrench to grip the fitting securely. Apply steady, even pressure rather than sudden jerks. Turn slowly and deliberately. You may feel resistance at first because mineral deposits and corrosion can lock these connections tight. Don’t panic if it takes effort.
Once the connection loosens, you can unscrew it by hand. Keep turning until you can separate the drain from its anchor point. As you work, gently extract the drain while supporting the surrounding area to prevent unnecessary stress on pipes or fixtures.
Carefully pull the drain tube straight out. Support it as it comes out to keep it from bending or catching on anything inside the wall or underneath the tub. Move slowly and steadily. If you encounter resistance, stop and check what’s catching before forcing it further.
As the drain emerges, water and debris may spill. Have your bucket ready to catch anything. Once the drain is completely out, set it aside on your towel and inspect what you’ve removed. Look at the interior of the drain opening for buildup or damage.
Note how the drain was oriented and seated. Take a photo if you’re unsure how to reinstall it later. This information matters if you’re replacing it or having professional help.
Steady pressure beats sudden force when removing stuck connections every single time.
Pro tip: If a connection won’t budge, apply a penetrating oil and wait 15 minutes before trying again rather than straining yourself or risking damage.
Step 4: Inspect and Clean the Drain Opening
With the drain removed, you now have a clear view of what’s been hidden underneath. Take time to inspect this opening carefully because what you find tells you whether the drain needs repair, replacement, or just cleaning. A thorough inspection prevents problems down the road.
Start by washing your hands thoroughly before touching anything. Look directly into the drain opening and note what you see. Shine your flashlight inside to examine the interior walls. You’re checking for several things that indicate problems.
Look for these warning signs:
Redness or swelling around the opening
Visible rust or corrosion on metal surfaces
Mineral deposits or calcification buildup
Debris, hair, or gunk clogging the passage
Cracks or damage to the drain body
Signs of water damage or seepage around the edges
Inspecting drain openings for redness and swelling helps identify whether infection or damage occurred. If you notice redness, swelling, or unusual discharge, document it with photos. These signs may mean professional repair is needed before you reinstall or replace the drain.
Use this table to interpret drain opening warning signs and suggested actions:
Warning Sign | What It Indicates | Recommended Action |
Redness/swelling | Possible infection or water damage | Document and seek pro advice |
Rust/corrosion | Aging or degraded metal | Consider replacement |
Mineral buildup | Hard water effects | Clean with mild solution |
Debris/gunk | Poor water flow | Remove debris, check for clogs |
Cracks | Structural weakness | Repair or replace drain body |
Water seepage | Leaky connections | Inspect and seal edges |
Now clean the area around the drain opening gently. Use a soft cloth or old toothbrush to remove loose debris. Don’t scrub aggressively, as you want to avoid damaging the surrounding tub finish. For stuck deposits, use your wire brush carefully or apply a mild cleaning solution to soften them first.
Rinse the entire area with clean water. Dry it completely with your towel. A dry opening prevents rust and allows you to see the true condition of the drain body. Make sure no water pools in or around the opening.
If you discovered damage, corrosion, or other issues, this is the time to decide whether repair or replacement makes sense. A badly corroded drain rarely works well and may need professional attention to install properly.
A clean, dry drain opening gives you the clearest picture of what needs to happen next.
Pro tip: Take clear photos of the opening from multiple angles before cleaning and after, so you have documentation if you need to consult a professional or order replacement parts.
Take Control of Your Tub Drain Issues with Expert Home Inspection Support
Removing a tub drain can be a tricky task filled with potential challenges like corrosion, leaks, and hidden damage. If you find yourself overwhelmed by rusty pipes, stubborn connections, or uncertain about what your drain inspection reveals, you are not alone. The detailed step-by-step guide highlights crucial pain points such as carefully loosening fittings, identifying signs of water damage, and ensuring a clean workspace to avoid further problems. Understanding these complexities shows why a thorough home inspection is vital to catch underlying issues before they turn costly.
At Trinity Home Inspections, we provide the professional expertise you need to uncover every concern within your home’s plumbing and structure. Our InterNACHI-certified inspectors use advanced tools like thermal imaging and moisture meters to detect hidden leaks, corrosion, or water damage that might not be obvious during regular repairs. With same-day photo and video-rich reports, you gain clear, actionable insights tailored to your home’s condition and your peace of mind. Whether you are a homeowner tackling tub drain maintenance or preparing for a sale, trust our family-owned, faith-driven approach to protect your investment.
Explore how our inspection services bring clarity to your home maintenance challenges.
Learn why thorough inspection beats DIY when it comes to plumbing and drain issues.
Schedule your expert home inspection today to catch hidden problems before they escalate.

Don’t risk costly surprises by going it alone. Get a comprehensive evaluation from trained professionals who understand the details and demands of home plumbing systems. Contact Trinity Home Inspections now and move confidently forward with your home care plans.
Frequently Asked Questions
What tools do I need to remove a tub drain?
You’ll need an adjustable wrench, screwdrivers, pliers, a flashlight, and a bucket to catch any spills. Gather these tools before starting to ensure a smooth process.
How do I prepare the area before removing the tub drain?
Clear clutter from around the tub, lay down towels, and ensure good lighting. Create a clean, organized workspace to prevent accidents and make the job easier.
What steps should I follow to loosen and remove the drain cover?
Start by washing your hands, then inspect how the cover is secured, whether by tape or caulk. Gently loosen the securing materials and carefully lift the cover from the tub without damaging it.
How do I unscrew and extract the tub drain once the cover is off?
After removing the cover, use your adjustable wrench to turn the drain connection counterclockwise. Apply steady pressure and pull the drain straight out to avoid damaging the pipes.
What should I look for when inspecting the drain opening?
Check for rust, corrosion, or debris buildup in the drain opening. Make sure to note any signs of damage or water leakage that may require repair or professional help.
How can I clean the drain opening effectively?
Use a soft cloth or old toothbrush to clean loose debris from the opening. For tougher buildup, apply a mild cleaning solution and gently scrub without damaging the surrounding area.
Recommended

