How to Prep and Paint After Construction Dust for Lasting Results
- Matt Cameron
- 2 days ago
- 11 min read

You just finished a renovation. The drywall is up, the trim looks sharp, and you are ready to roll on that fresh coat of paint. Two months later, the paint is already peeling, chalky, and chipping along every seam. The culprit is almost never the paint brand or the painter’s technique. It is the invisible layer of construction dust that got sealed underneath. Painting over construction dust leads directly to poor adhesion, a chalky surface, and premature failure. This guide walks you through every step to clean, prep, and paint correctly so your results actually last, especially in the humid, salty air of coastal Alabama.
Key Takeaways
Point | Details |
Never paint over dust | Leaving construction dust behind guarantees peeling, poor adhesion, and a short-lived finish. |
Follow a multi-step cleaning process | Use a HEPA vacuum and tack or microfiber cloths to remove every bit of dust before painting. |
Humidity requires extra precautions | Gulf Coast homeowners should dehumidify, dry surfaces fully, and choose paint days carefully. |
Contain dust and follow safety rules | Proper containment and EPA-compliant precautions are critical, especially in older homes with possible lead. |
Verify before painting | Check for hidden dust and ensure dry, clean walls to maximize your paint job’s durability. |
Why you should never paint over construction dust
Construction dust is not like ordinary household dust. Drywall dust, in particular, is made of fine gypsum particles that settle into a thin, powdery film over every surface in the room. When you apply paint on top of that film, the paint bonds to the dust rather than the wall. The result is a surface that looks fine for a few weeks and then begins to crack, peel, and chip.
Important: Poor adhesion, chalky appearance, peeling, and chipping are the direct consequences of painting over drywall dust. No amount of primer or extra coats will fix a surface that was not properly cleaned first.
The chemistry behind this is straightforward. Gypsum is a calcium sulfate compound. Its fine particles create a loose, unstable layer that prevents paint from forming a mechanical bond with the wall surface beneath it. Even a thin, nearly invisible coating is enough to cause failure.
Now layer in the Gulf Coast climate. Homes in Mobile, Daphne, Fairhope, and Gulf Shores regularly see relative humidity between 60 and 80 percent. That moisture gets trapped between the dust layer and the paint film, accelerating peeling and creating conditions where mold can develop behind the painted surface. What might be a minor inconvenience in a dry inland climate becomes a real, costly problem here.
The good news is that the fix is completely within your control. Proper dust removal before you paint is the single most important step you can take to protect your investment.
With the real risks in mind, let’s look at what you need before you start cleaning and prepping your surfaces.
Essential tools and materials for dust-free painting
Using the right tools makes the difference between a thorough clean and just moving dust around. Standard feather dusters and household brooms are not designed for fine gypsum particles. They scatter the dust into the air, where it resettles on the very surfaces you just cleaned.
HEPA vacuums and microfiber cloths are the essential combination for removing fine construction dust without damaging surfaces. Avoid wet cleaning as a first step because it turns drywall dust into a paste that is much harder to remove.
Here is a breakdown of the tools you need and how they compare:
Tool | Best use | Notes |
HEPA vacuum | First-pass dust removal | Traps fine particles instead of recirculating them |
Tack cloth | Bare drywall or unfinished wood | Sticky surface grabs fine dust effectively |
Microfiber cloth | Previously painted surfaces | Gentle enough to avoid scratching |
Dehumidifier | Moisture control during prep | Critical in Gulf Coast conditions |
N95 respirator | Personal protection | Required when working with drywall dust |
Plastic sheeting | Containment barriers | Seals off vents and adjacent rooms |
Beyond the tools listed above, you should also have on hand:
Drop cloths to protect floors during cleaning and painting
Painter’s tape to protect trim and edges
Bright work light or flashlight for surface inspection at an angle
Bucket and clean water for a final damp wipe if needed
Mildew-resistant primer for rooms with high humidity exposure
Pro Tip: Buy more tack cloths than you think you need. Once a tack cloth is loaded with dust, it stops picking up particles and starts depositing them back on the wall. Swap it out frequently.
For a broader look at cleaning equipment for home prep, proper tool selection applies to every surface in your home. The builder post-construction guide from professional cleaning services also outlines product recommendations that apply well to Gulf Coast homes.
Now that you know what you’ll need, here’s how to use these tools to prepare your surfaces thoroughly before painting.
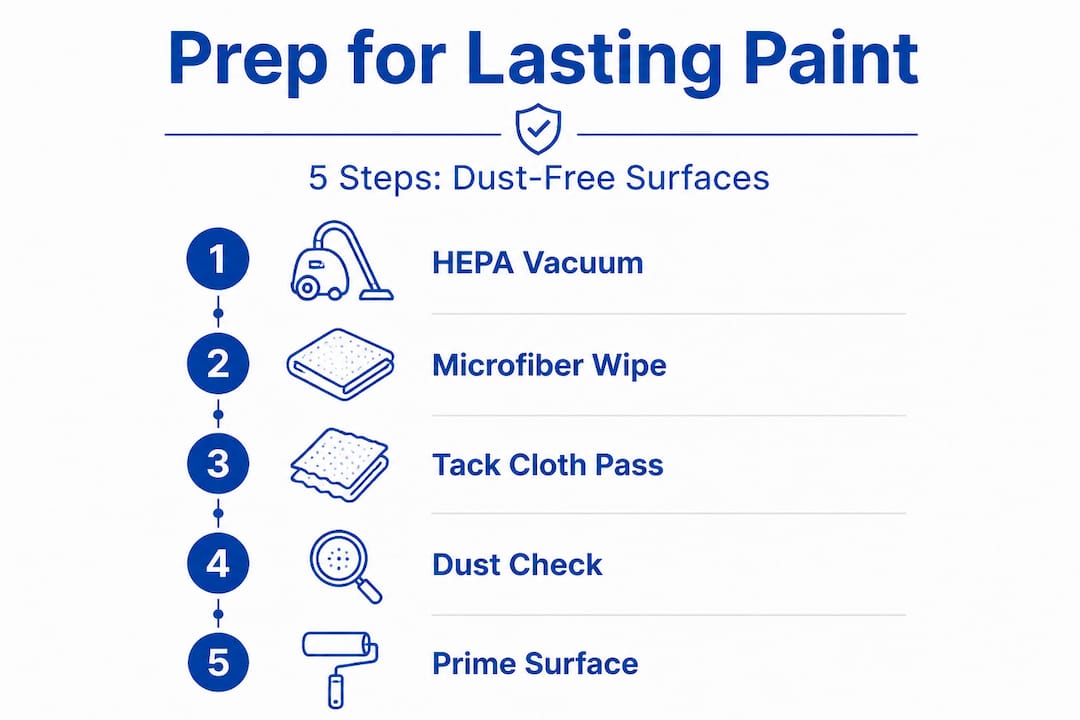
Step-by-step cleaning process before painting
Following a structured process is what separates a paint job that lasts from one that fails in a season. Here is the sequence that professionals use, adapted for the humidity challenges you face on the Gulf Coast.
Seal off the workspace. Close all HVAC vents in the room and cover them with plastic sheeting and tape. Seal doorways with zip-up plastic barriers or taped sheeting. This prevents dust from migrating to other rooms and stops the HVAC system from pulling particles into the ductwork.
Let the dust settle. After any sanding or drywall work, wait at least one to two hours before cleaning. Rushing this step means you will be vacuuming while particles are still airborne, which is inefficient.
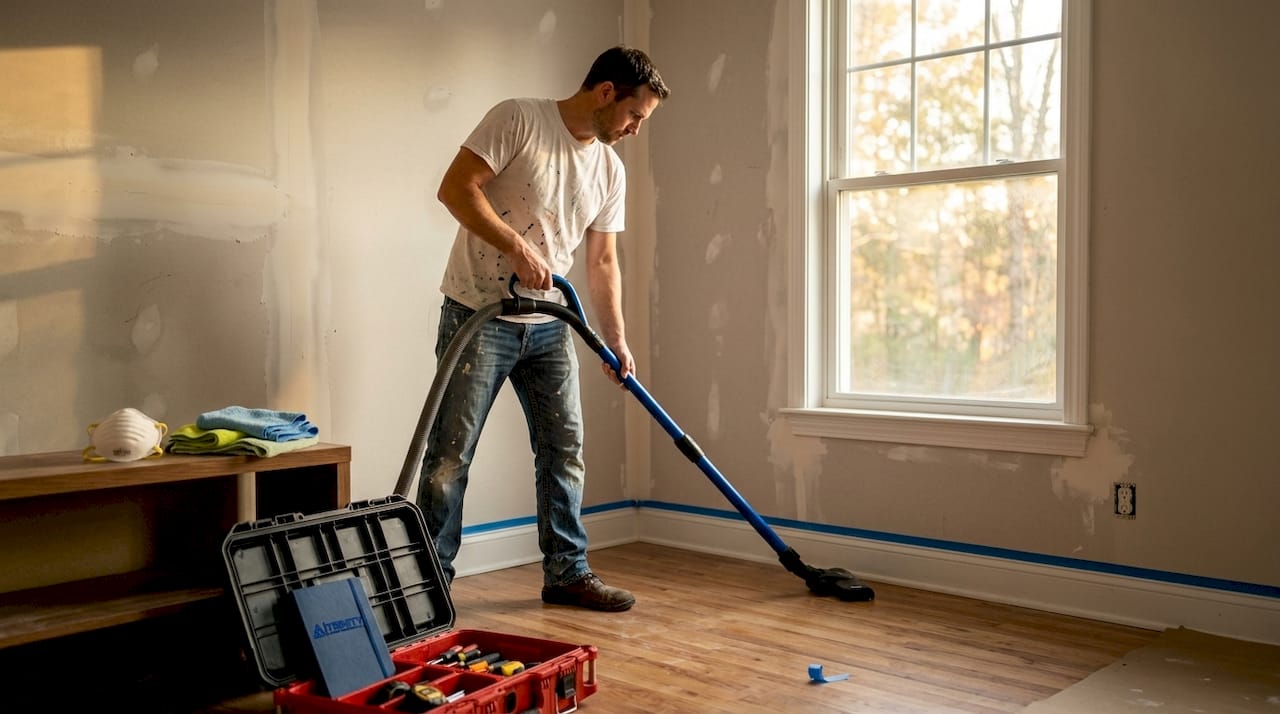
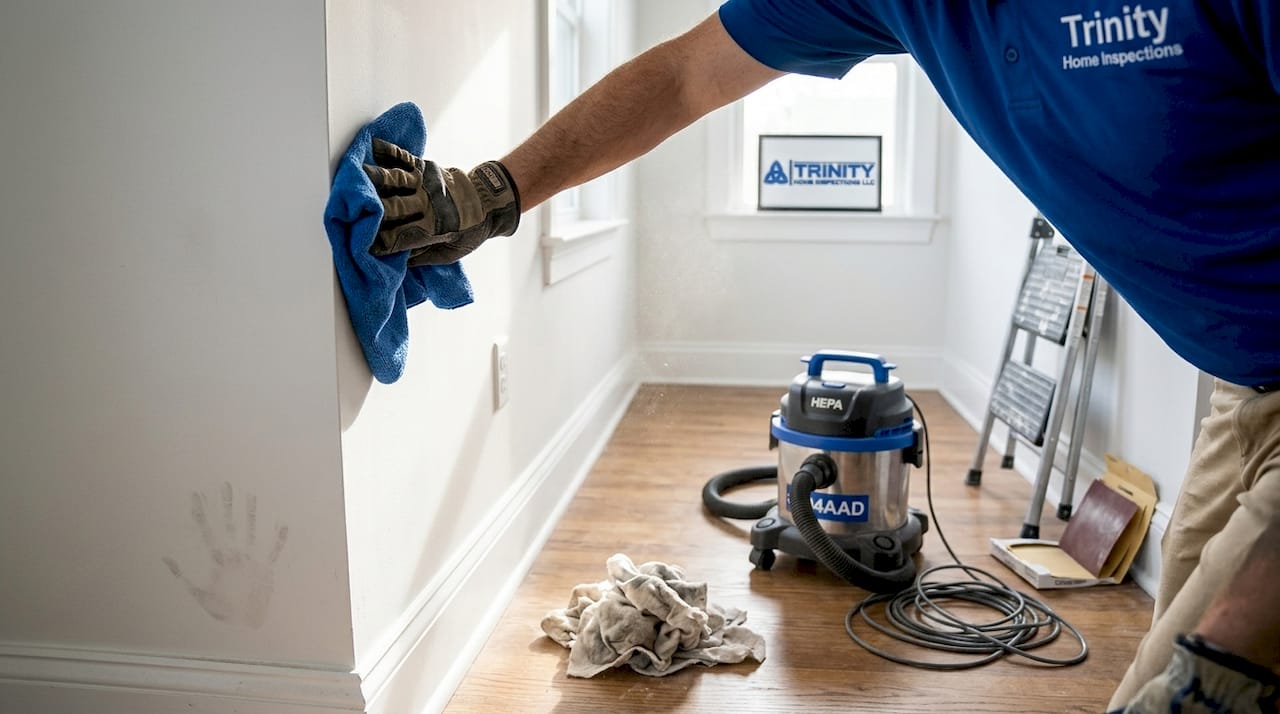
Vacuum with a HEPA filter. Vacuum first, then use a tack cloth or slightly damp microfiber cloth to capture fine particles in multiple passes. Never use a standard shop vac without a HEPA filter. Start at the ceiling and work downward so falling particles get captured in later passes.
Wipe with a tack cloth or microfiber cloth. For bare drywall, use a tack cloth. For previously painted surfaces, use a dry microfiber cloth. Inspect the cloth after every two to three feet of surface. When it looks gray and loaded, switch to a fresh one.
Assess whether a damp wipe is needed. In some cases, a very slightly damp microfiber cloth can pick up the last fine particles. However, drywall dust turns to paste when wet, so always complete all dry cleaning steps first. Only use a damp cloth if the surface still shows visible dust after dry methods.
Allow walls to dry completely. After any damp wipe, wait one to two hours minimum. In high humidity conditions, extend that to three or four hours and run a dehumidifier in the room.
Inspect under bright light. Hold a flashlight or work light at a sharp angle to the wall surface. Dust will cast tiny shadows that are invisible under normal overhead lighting. If you see any remaining haze, repeat the dry wipe step.
Pro Tip: Do your final dust inspection at night with all overhead lights off. Use only a bright flashlight held parallel to the wall surface. This raking light technique reveals dust, scratches, and surface irregularities that daylight and overhead lighting completely hide.
For additional guidance on prep cleaning after renovation, proper surface preparation applies across all renovation projects. The dust control tips resource also covers multi-room strategies for keeping dust contained during active projects.
Once your space and surfaces are dust-free, it’s essential to address a few Gulf Coast challenges before you break out the paint.
Climate and dust: Special challenges on Alabama’s Gulf Coast
The Gulf Coast is a beautiful place to live, but it is genuinely one of the harder environments for painting and surface prep. Relative humidity regularly sits between 60 and 80 percent throughout much of the year. Drying times extend significantly at high humidity, and the ideal range for painting is 40 to 50 percent relative humidity. Getting there requires active moisture management, not just opening a window.
Here are the specific challenges you need to plan for:
Extended drying times. What dries in one hour inland may take three to four hours in coastal Alabama. Build this into your schedule before painting.
Salt air exposure. Homes near Orange Beach, Gulf Shores, and Dauphin Island face salt-laden air that can contaminate surfaces even after cleaning. A thorough wipe-down with a clean microfiber cloth just before painting removes this residue.
Mold risk. Dust trapped under paint in a humid environment creates a food source for mold. Preparation accounts for 70% of paint job success in coastal climates, and that includes using mildew-resistant primer and paint.
Seasonal timing. Spring and fall are generally the best seasons for interior painting in coastal Alabama. Summer brings extreme humidity, and winter, while drier, can still see humidity spikes during Gulf weather systems.
Pro Tip: Rent a dehumidifier for the room you are painting and run it for 24 hours before you begin. Target a reading of 45 to 50 percent relative humidity on a basic hygrometer before you apply any paint or primer. This single step can meaningfully extend the life of your paint job.
For more on humidity control strategies specific to Gulf Coast homes, and for a complete look at Gulf Coast exterior maintenance, these resources cover the broader picture of protecting your home in this climate. The renovation cleanup guide also addresses post-construction moisture management in detail.
Alongside humidity, it’s key to address health and safety concerns such as lead dust when painting older homes.
Safety first: Dust containment and hazards in older homes
Dust containment is not just about keeping your home clean. In certain situations, it is a serious health and legal matter. This is especially true in homes built before 1978.
Use plastic sheeting, zip-up barriers, and close HVAC vents to prevent dust from spreading during construction and sanding. These containment measures protect your family, your HVAC system, and the rest of your home from contamination.
Critical warning: Pre-1978 homes require EPA lead-safe practices for any renovation, repair, or painting project that disturbs existing paint. Sanding or scraping old paint in these homes can release hazardous lead dust that is invisible to the naked eye.
If your home was built before 1978, here is what you need to do before any sanding or scraping:
Test for lead paint using an EPA-recognized test kit or hire a certified lead inspector.
Use certified contractors for any work that disturbs painted surfaces. Look for EPA RRP (Renovation, Repair and Painting) certified professionals.
Never dry-sand lead paint. Wet methods or HEPA-equipped power tools are required.
Dispose of debris properly. Lead-contaminated dust and materials require specific disposal procedures.
Keep children and pregnant women out of the work area until cleanup is fully complete and verified.
For more on lead paint safety and what encapsulation means for your home, that resource covers the options in plain terms. You should also review guidance on protecting HVAC from dust since ductwork contamination is one of the most overlooked risks during renovation projects. The post-construction cleanup guide from professional cleaners also outlines containment best practices.
With preparation and safety handled, take these final checks before you start painting.
Final checks: Ensuring a dust-free, paint-ready surface
Before you open a can of paint, take fifteen minutes to run through these final verification steps. Skipping this stage is where many homeowners lose the progress they made during cleaning.
Raking light inspection. Hold a bright flashlight at a low angle to every wall surface. Any remaining dust will cast visible shadows. Mark problem areas with a small piece of tape and re-wipe them.
White cloth test. Run a clean white microfiber cloth across the surface. If it comes away with any gray or white residue, the surface is not ready.
Check corners and edges. Dust accumulates heavily in corners, along baseboards, and at ceiling lines. These areas need extra attention with a folded tack cloth.
Verify humidity. Check your hygrometer one final time. If relative humidity is above 55 percent, run the dehumidifier longer before you begin.
Inspect for resettled dust. Professionals use multi-phase cleaning with two to three visits because dust resettles after the initial clean. If you cleaned yesterday, do a quick vacuum and wipe again today before painting.
Verification step | Tool needed | Pass condition |
Raking light check | Flashlight | No visible dust shadows |
White cloth test | Clean microfiber cloth | Cloth stays white |
Corner inspection | Tack cloth | No dust on cloth |
Humidity check | Hygrometer | Below 55% RH |
Final vacuum pass | HEPA vacuum | No visible debris |
Once all five checks pass, you are genuinely ready to prime and paint. Do not skip straight to paint on bare drywall. A quality primer coat seals the surface and gives the topcoat something solid to bond to.
Now let’s step back and explore the broader lessons this process reveals for any homeowner in a coastal, high-humidity region.
Why prepping for dust is 70% of painting success in humid climates
Here is an honest observation after working with homeowners across Baldwin and Mobile counties: the ones who call about failed paint jobs almost always skipped or rushed the prep. They bought quality paint, used good brushes, and applied two coats. But they did not clean the surface thoroughly first, and the Gulf Coast humidity did the rest.
Professional paint jobs in Mobile last 3 to 6 years compared to 5 to 10 years for similar work in drier inland climates. That gap exists because of humidity and salt exposure, not because of inferior materials. Proper dust prep before painting is one of the few things you can control that directly extends how long your paint job holds up.
The uncomfortable truth is that most paint failures are not paint failures at all. They are surface preparation failures. The paint did exactly what it was supposed to do. It just had nothing solid to bond to.
We also see homeowners underestimate how much dust a single drywall patch or sanding session generates. A small repair in one room can coat surfaces in adjacent rooms with a fine layer of gypsum dust if containment is not used. That dust travels through HVAC systems, settles on shelves, and lands on walls you were not planning to repaint. Addressing containment from the start saves you from a much larger cleaning job later.
For Gulf Coast homeowners specifically, the investment in a dehumidifier, HEPA vacuum, and quality tack cloths pays for itself the first time you avoid a full repaint. Check the exterior maintenance for Gulf homeowners resource for a broader view of how climate-smart maintenance protects your home’s value over time.
Need professional help with painting prep or inspections?
If your renovation uncovered signs of moisture, mold, or damage that goes deeper than surface dust, a professional inspection gives you the full picture before you paint over anything.
[

At Trinity Home Inspections, we serve homeowners across Mobile, Baldwin, Escambia, and surrounding Gulf Coast Alabama counties. Our InterNACHI-certified inspectors use thermal imaging, moisture meters, and air quality testing to identify hidden problems that paint and primer cannot fix. If you suspect mold behind your walls or moisture damage from a past leak, our mold inspection services can confirm what is actually there before you seal it in. For a complete picture of your property’s condition, our home inspections give you same-day reports with photos, video, and clear priorities so you know exactly what needs attention.
Frequently asked questions
What happens if you paint over drywall dust without cleaning?
Paint will not adhere properly, resulting in a chalky appearance, peeling, and chipping that typically appears within weeks to months of application.
How do you remove construction dust before painting in a humid climate?
Vacuum with a HEPA filter first, follow with a tack cloth or dry microfiber cloth, and allow walls to dry completely before applying any primer or paint.
Why shouldn’t you use a wet cloth on drywall dust first?
Drywall dust turns to paste when wet, making it far harder to remove than dry dust, so always complete all dry cleaning steps before introducing any moisture.
What should I do if my home was built before 1978?
Test for lead paint before any sanding or scraping, and follow EPA lead-safe practices for all renovation work, including hiring RRP-certified contractors if needed.
How does Gulf Coast humidity affect paint jobs after construction dust cleanup?
High humidity from 60 to 80 percent RH significantly slows drying times and increases the risk of poor adhesion, so always monitor humidity levels and use a dehumidifier to reach the ideal 40 to 50 percent range before painting.
Recommended