Step-by-Step Guide to Replacing Buckled LVP Flooring
- Matt Cameron
- Apr 22
- 10 min read


TL;DR:
Buckling LVP flooring in Gulf Coast homes is mainly caused by moisture from the subfloor.
Proper preparation, including moisture testing and subfloor repairs, prevents future buckling.
Professional inspections help identify hidden water issues that cause recurrent flooring problems.
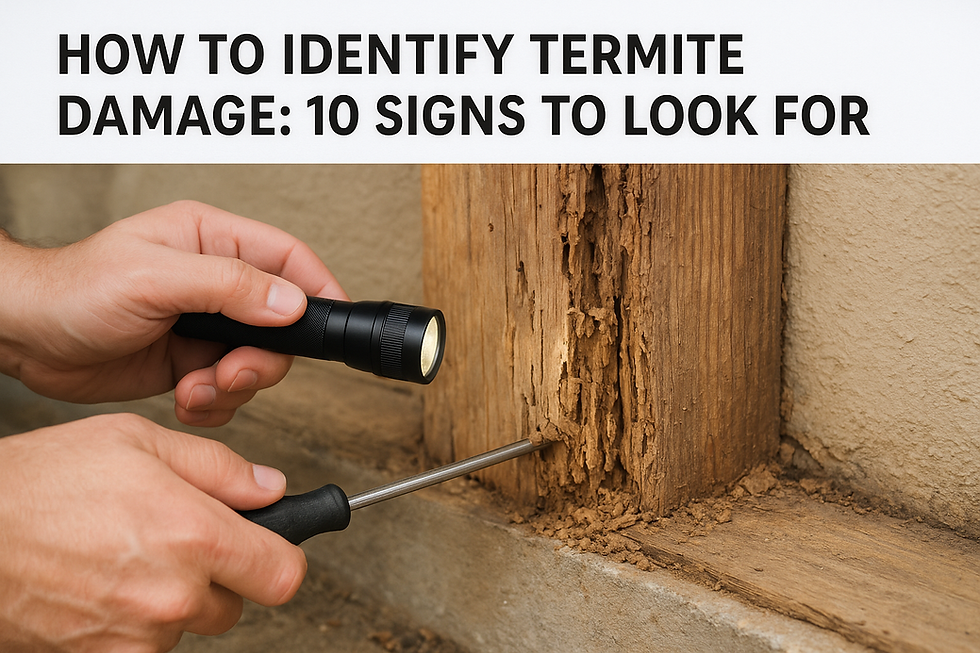
Buckled luxury vinyl plank flooring is one of the most frustrating problems Gulf Coast homeowners face. You spend good money on a floor that looks great, and then the Alabama heat, humidity, and coastal moisture do their work. Planks start lifting, ridges appear, and what was once a smooth surface feels like a ripple in a pond. In a region where indoor humidity can hover above 70% for months at a time, LVP flooring is especially vulnerable. This guide walks you through every step: understanding why buckling happens, gathering the right tools, executing a clean replacement, and preventing the problem from coming back.
Key Takeaways
Point | Details |
Identify the cause | Diagnosing why your LVP buckled is the first step to a lasting fix. |
Prepare and work safely | Gather the right tools and use protective gear to avoid injuries. |
Follow steps carefully | Proper removal, prep, and installation techniques ensure results last. |
Monitor for moisture | Ongoing moisture checks prevent future buckling and damage. |
Understanding why LVP flooring buckles
Before you pull a single plank, you need to know what caused the buckling. Skipping this step is the number one reason homeowners end up right back where they started six months later. Replacing damaged flooring without fixing the root cause is like painting over rust. It looks fine for a while, but the problem is still there.
Moisture is the leading cause of LVP buckling in humid climates, and Gulf Coast Alabama puts that fact on full display. The region’s combination of high outdoor humidity, frequent rain events, and homes built on slab foundations creates the perfect environment for moisture to seep upward through concrete and into your flooring system.
Common causes of LVP buckling include:
Excess moisture from the subfloor, especially concrete slabs without a proper vapor barrier
Leaking plumbing, appliances, or roof intrusions that go undetected under the floor
Improper installation with insufficient expansion gaps along walls and doorways
Temperature swings that cause the vinyl to expand and contract repeatedly
Subfloor irregularities where high spots or dips cause stress on the planks over time
Poor acclimation before installation, meaning the planks were not given time to adjust to room conditions
LVP is designed to float, meaning it is not fastened directly to the subfloor. That floating system works well when conditions are stable, but it becomes a liability when moisture or temperature push the planks beyond their designed tolerance. You can learn more about how this compares to other options by reading about LVP vs tile in Gulf Coast homes, which covers why each material reacts differently to regional conditions.
Signs your floor needs replacement rather than repair:
Planks are visibly warped or cupped and will not lay flat
Lifted edges that catch on furniture or pose a tripping hazard
Persistent ridges running across multiple planks in a row
Soft or spongy feel underfoot, which often signals subfloor damage beneath
Mold or mildew odor coming from the floor area
If you see one or two planks with minor lifting, a repair may be possible using fixing buckled LVP techniques. But when the damage spans a wide area or the subfloor itself is compromised, replacement is the right call. Also watch for foundation problems signs like uneven floors or sticking doors, which can contribute to ongoing flooring stress.
Pro Tip: Pick up an inexpensive moisture meter at any hardware store and test your subfloor before and after replacement. Readings above 12% in wood subfloors signal a moisture problem that must be resolved before new flooring goes down.
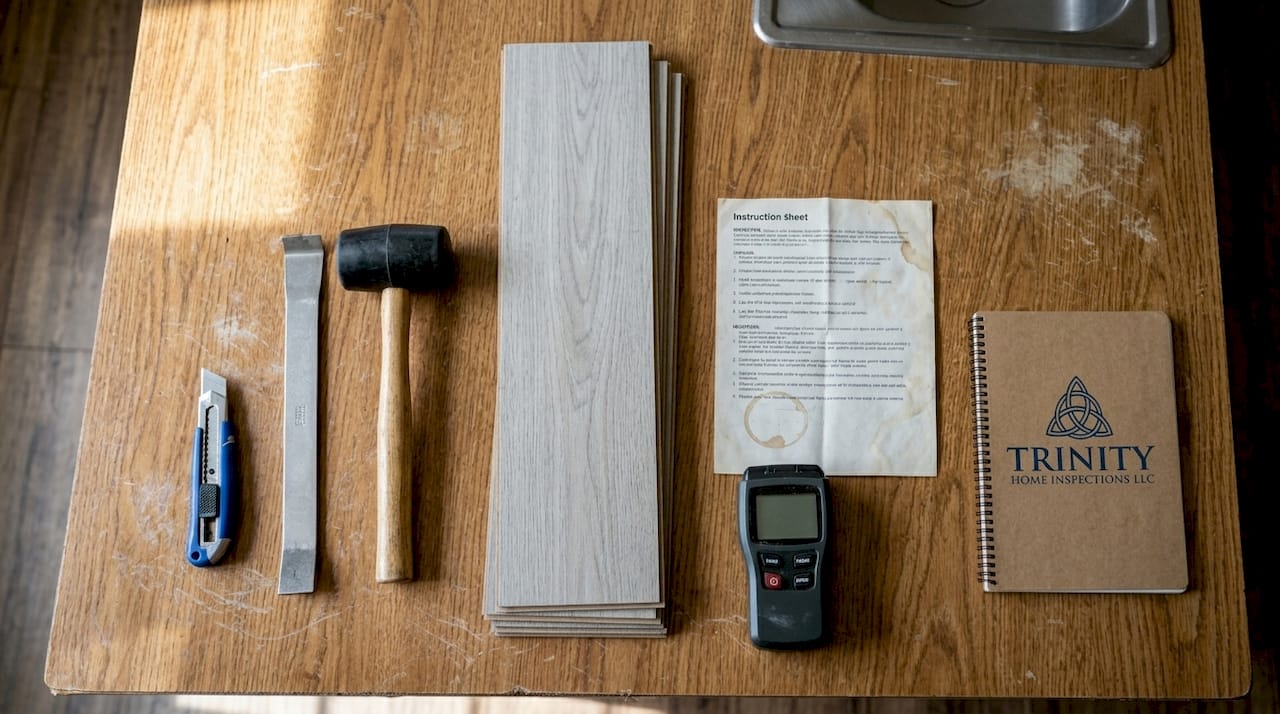
Tools, materials, and safety: What you need before starting
Once you know why the buckling happened, you can commit to replacement with confidence. But showing up underprepared creates new problems. Good preparation helps prevent common replacement dangers and mistakes, and that principle applies just as much to flooring as it does to any other home project.
Safety warning: Removing damaged LVP planks can expose hidden hazards. Older homes may have adhesive containing harmful compounds beneath existing flooring. Moisture damage can also hide mold growth underneath planks. Always wear a respirator and gloves when removing old flooring, and ventilate the room thoroughly before starting.
Here is what you need to gather before you begin:
Tool or material | Purpose | Gulf Coast note |
Replacement LVP planks | Match existing floor or full replacement | Buy 10% extra for cuts and future repairs |
Moisture meter | Verify subfloor is dry enough | Essential in Gulf Coast homes |
Vapor barrier or moisture barrier sheet | Block moisture rising from slab | Critical for slab foundations |
Underlayment (if not pre-attached) | Cushion and sound absorption | Choose moisture-resistant type |
Utility knife and spare blades | Cut planks to size | Replace blades often for clean cuts |
Pull bar and tapping block | Seat click-lock planks without damage | Standard LVP installation tools |
Pry bar and hammer | Remove baseboards and trim | Use gently to avoid wall damage |
Knee pads | Protect joints during floor work | Trust us, you will need these |
Safety glasses | Eye protection from debris | Required any time you cut planks |
Respirator or N95 mask | Protection from dust and mold | Non-negotiable in coastal homes |
Dehumidifier | Lower room humidity during install | Rent if you do not own one |
Shop vacuum | Keep work area clean | Debris under planks causes problems |
Quick checklist before you start work:
Confirm new planks match your existing floor profile or plan for a full room replacement
Run your dehumidifier in the room for 24 to 48 hours before installation
Verify subfloor moisture readings are within safe limits
Check that your new planks are the same installation type as the existing floor (click-lock or glue-down)
Read the manufacturer’s installation guide for your specific LVP product
Review DIY home maintenance tips if you want a broader checklist for keeping your home in good condition
For Gulf Coast homeowners specifically, the dehumidifier is not optional. Installing new LVP planks in a room with 70% or higher ambient humidity is asking for the same problem to return within months.
Step-by-step instructions to replace buckled LVP flooring
With all your prep complete, the following order of steps ensures a professional-quality replacement. Work methodically and do not rush the subfloor preparation phase. That step alone determines whether your new floor lasts five years or fifteen.
Before the numbered steps begin: Remove all furniture from the room. Take off baseboards and transition strips carefully using a pry bar, and label them so you know where each piece goes back. Work slowly along the wall to avoid cracking the trim.
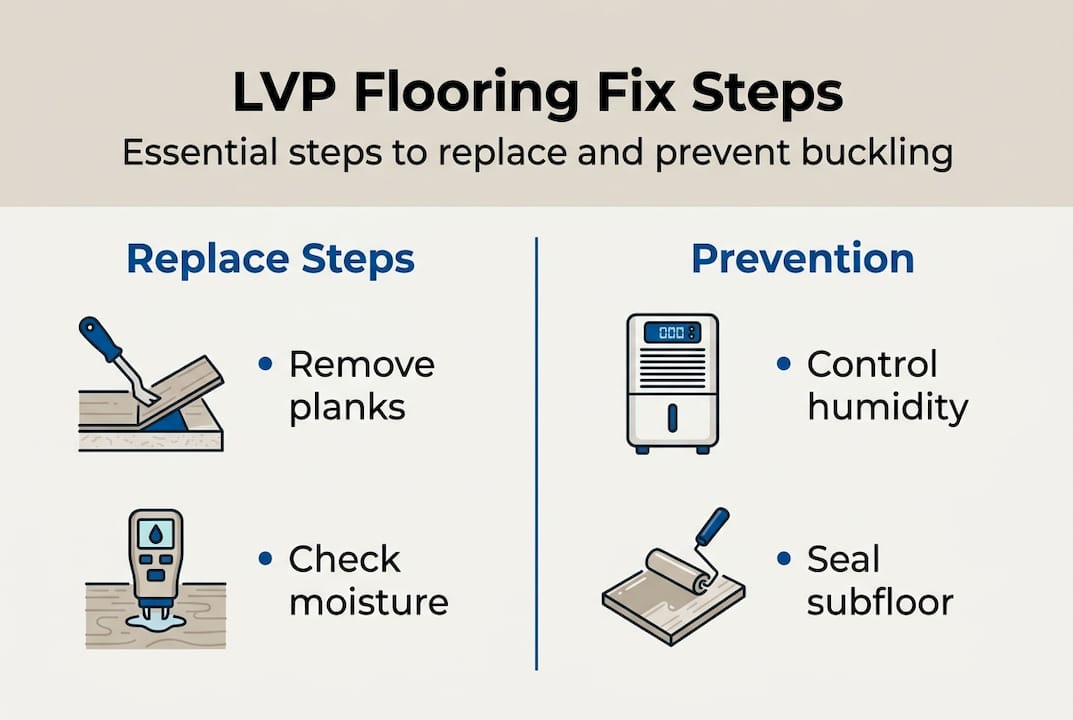
Identify and isolate the damaged section. Walk the floor carefully and mark all buckled, lifted, or damaged planks with painter’s tape. If the damage is isolated to one area, you may only need to remove those planks. If damage runs across most of the room, plan for a full replacement.
Remove the damaged planks. For click-lock systems, start at the nearest wall or open edge and unclick planks row by row. For glue-down systems, use a floor scraper to carefully lift planks without gouging the subfloor beneath. Dispose of damaged material promptly.
Inspect and prepare the subfloor. This is the most important step. Check for soft spots, mold, water staining, or warped wood. Sand down any high spots above 3/16 inch and fill low spots with floor leveling compound. If the subfloor itself is damaged by moisture, it must be repaired or replaced before any new flooring goes down.
Install or replace the moisture barrier. Lay a new vapor barrier sheet across the entire work area, overlapping seams by at least six inches and taping the joints. For concrete slabs common in Gulf Coast homes, this step is not optional.
Acclimate your new planks. Leave the new LVP planks in the room for a minimum of 48 hours, still in their boxes. This allows them to adjust to the room’s temperature and humidity before installation. Skipping this step is one of the top reasons proper installation fails and buckling returns.
Install the new planks. Work from the same starting row as the original installation. For click-lock, use a tapping block and pull bar to seat planks without forcing. Maintain a 1/4 inch expansion gap at all walls and fixed objects. For glue-down, apply the recommended adhesive and press each plank firmly, using a roller to ensure full contact.
Reinstall trim and inspect. Replace baseboards and transition strips. Walk the entire floor and press down on every plank to check for movement. Look for gaps, ridges, or loose edges before returning furniture.
Glue-down vs. click-lock: which is right for your replacement?
Factor | Click-lock | Glue-down |
Installation difficulty | Moderate, DIY friendly | More involved, less forgiving |
Moisture resistance | Good with barrier | Better when glued fully |
Repair ease | Easy, planks unclick | Harder, must scrape adhesive |
Best for Gulf Coast | Solid choice with barrier | Better for high-moisture areas |
Cost | Lower upfront | Higher labor and material cost |
Pro Tip: Always buy 10% more planks than your square footage requires. Keep the extras stored flat in a climate-controlled space. If one plank buckles or gets damaged years later, having a matching spare saves you from a full floor replacement. You should also consult a resource on choosing a home inspector before purchasing a home with existing LVP, so you know its true condition before you close.
For more visual guidance on this process, the replacing damaged LVP tutorial offers helpful step-by-step photos that align with the process above.
Troubleshooting, prevention, and when to call a pro
Once installed, it is vital to monitor your new LVP flooring for common issues and know when outside help is required. Most post-installation problems are minor and fixable. But some are warning signs of a bigger issue underneath your home.
Common post-installation problems and quick fixes:
Squeaking or clicking sounds: Usually caused by debris under the planks or uneven subfloor spots. Pull back the affected plank, clean the subfloor, and reinstall.
Loose edges near walls: Often means the expansion gap was cut too small or baseboards are pressing down on the plank. Re-trim or adjust the baseboard position.
Persistent ridge in one spot: Check the subfloor beneath for a high spot you may have missed during prep. Sand or fill as needed and reinstall.
New buckling appearing within weeks: This almost always means an unresolved moisture source. Do not ignore it.
Caution: If you see new buckling appear in your freshly installed floor within 30 to 90 days, the moisture source was not eliminated. Do not install a third floor over the same subfloor without identifying and fixing the source. You will repeat the problem indefinitely.
Recurring buckling may indicate deeper home issues like moisture intrusion or foundation movement, both of which are common in Baldwin County and across the Gulf Coast region. You can also review buckled floor causes to cross-reference what you are seeing with known contributing factors.
Signs you should not try to DIY this repair:
You cannot identify where the moisture is coming from
The subfloor is soft, spongy, or visibly rotted in multiple areas
You smell mold but cannot find visible growth
The floor is buckling in multiple rooms or across the whole house
Your home is showing other signs of foundation movement
For ongoing prevention, run your HVAC system consistently to keep indoor humidity below 60%. Place moisture-absorbing products near exterior doors and in enclosed spaces. Schedule routine moisture inspection checks, especially after major rain events or storms. And use a checklist for prioritizing repairs after inspection to stay organized about what needs attention first.
Pro Tip: Document every repair with photos and keep records of product receipts, moisture readings before and after, and any contractor invoices. This documentation protects your warranty, supports insurance claims if a leak caused the damage, and gives future buyers confidence in the home’s condition.
Why prevention is just as important as replacement
Here is an honest observation after seeing this problem play out in Gulf Coast homes repeatedly. Most LVP buckling failures are not flooring failures at all. They are preparation failures and moisture management failures that show up in the flooring because that is where the symptom is most visible.
Homeowners replace the floor, feel good about the result, and then skip the step that would actually protect the investment: finding out why the moisture was there in the first place. Six months later, the new floor starts to lift. The frustration is real, and it is entirely avoidable.
Moisture control reduces flooring failures significantly, and in a region like coastal Alabama, that means being proactive rather than reactive. A proper moisture inspection before you install can identify elevated readings in the subfloor, trace them to a source, and give you a clear action plan.
The cost of a professional inspection is a fraction of what you will spend replacing flooring a second time. Sealing the subfloor correctly, fixing a slow plumbing drip, or improving crawl space ventilation can each add years to your floor’s life. Think of replacement as treating the symptom and inspection as treating the cause. You need both, but the inspection should come first.
Pro Tip: Always pair any flooring replacement project with a whole-home moisture evaluation. Even if your inspector only looks at the affected area, the findings may surprise you.
Get professional help for lasting results
Replacing buckled LVP flooring yourself is absolutely doable, but the results only last when the underlying cause is resolved. In Gulf Coast Alabama, that cause is almost always moisture, and moisture does not always reveal itself during a visual check.

At Trinity Home Inspections, we use professional moisture meters and free thermal imaging to help pinpoint where water is entering your home, whether it is through a slab, a wall cavity, or a leaking pipe hidden behind drywall. Our mold inspection services go a step further, identifying growth that may already be present beneath damaged flooring. We also offer a property permit search to verify that any past flooring or structural work was permitted and done correctly. If you want your new floor to last, let us help you understand what is happening beneath it. Reach out to Trinity Home Inspections today.
Frequently asked questions
How do I know if my LVP flooring needs replacement or just repair?
Replacement is needed when planks are warped, lifted, or the moisture problem persists after repair. A few isolated lifted edges may be fixable, but widespread damage or soft subfloor areas almost always call for full replacement rather than a patch.
What moisture level is safe for installing new LVP flooring?
Moisture levels should be below 12% for wood subfloors and near zero for concrete before installing LVP. Exceeding these thresholds almost guarantees problems, so always verify with a meter before laying a single plank, as outlined in LVP installation guidance.
Can LVP be replaced without removing the whole floor?
Yes, you can replace individual planks if you can match the product and correct the moisture issue first. Click-lock systems make partial LVP replacement more practical than glue-down systems, which require more effort to separate cleanly.
What causes repeated buckling after replacement?
Ongoing moisture intrusion or foundation problems are often to blame for repeated buckling after replacement. If your new floor starts lifting within weeks or months, the root cause was never resolved and should be inspected professionally.
Recommended